Showing posts with label aleene's fabric fusion. Show all posts

Wednesday, August 25, 2010

ILoveToCreate Teen Crafts: Flower Child Headband

ILoveToCreate Teen Crafts
Flower Child Headband
Copyright Margot Potter
"Mom crafted, teen approved."

I bought this exquisite Alexander Henry fabric to fashion curtains for my kitchen two years ago. My first attempt was a painful reminder of the old adage "Measure Twice, Cut Once." I adore vintage inspired fabrics and the colors in this are fantastic. I had some scraps left over and a sewn hem from the curtains. This idea popped into my head while I pondered some stretchy headbands I purchased a while back. I've shown how to create these fabric flowers before, in fact at the end of this post are several fabric flower projects I've created for ILoveToCreate.

This is so easy and fun and this headband can either be worn in a Flower Child style or as a traditional headband. Either way, this is the kind if accessory a stylish teen will adore.

Materials
Aleene's Fabric Fusion Glue
Large Floral Print Fabric
Coordinating craft felt
Stretchy headband
Thread

Tools
Sewing needle
Paintbrush

1. Select a flower to feature as the focal of the design. Cut it out, leaving fabric around it in a circle or oval shape.


2. Place fabric on felt and cut the felt just a little bit wider than the fabric.


3. Use a paintbrush and apply a thin layer of Aleene's Fabric Fusion glue on the back of the fabric. Press fabric on felt smoothing gently with your hands. Allow to dry.

4. I had a doubled up and sewn fabric section, but you can just double some fabric over, iron and create your fabric flower. I have a tutorial for this here and here.

5. Once felt has dried, cut felt edge off of flower to get a smooth edge.

6. Sew the fabric flower to the headband.

6. Sew the center of the felt backed flower and a black bead into the center of the fabric flower, the thread should go through to the headband so it's nice and securely attached.


Wednesday, July 28, 2010

ILoveToCreate Teen Crafts: Playful Pom Pom Necklace


ILoveToCreate Teen Crafts
Playful Pom Pom Necklace
Copyright Margot Potter
"Mom crafted, kid approved."

Pom poms have a habit of proliferating in my studio. I just keep buying big bags of them with vague thoughts of projects to come. This idea has been rolling around my brain for a while now and yesterday, with a lot of help from my wonderful husband, this necklace was born. Kooky? Yes, yes it is. Fabulous? Well, of course! It's also lightweight, soft and fluffy. It's not for stuffy, stodgy, conservative folks, this is for the teen with a sense of fun. Much like the designer, who, while not a teen, likes playful accessories with a heaping helping of whimsy.

This is so easy and fun to make and you can take it in so many directions. Pom poms come in all sorts of sizes and colors, so if neon isn't working for you, change up the color palette! A nice black and white story would be striking! These pom pom circles can decorate purses, t-shirts, jeans, headbands, flip flops...where you put them is entirely up to you. After trying this on, I added a final layer of pom poms to the back of the earrings. So you can decide how you prefer to wear it. I'll be sporting this at CHA (a big craft trade show I'm attending this week) and Avalon will take it over afterward. She thought it was adorable and her opinion, as a stylish and fashion forward teen, is the one that counts. This is so affordable, so easy and so fun to make, it's the perfect antidote to the mantra of summer, "Mom...I'm bored."

Materials
Black craft felt
Multiple sized neon pom poms
Aleene's Fabric Fusion glue
11 10mm silver plated jump rings
QuickLinks Oval Chain
2 silver plated swivel lobster clasps
2 silver plated ear wires
2 2" silver plated head pins
(all jewelry making supplies and tools provided by Beadalon)

Tools
White fabric tracing pencil
3 round objects (1.5", 1.75" and 2" diameter)
Fabric scissors
Crop-a-dile or other 1/16" hole punch
2 pairs chain nose pliers
Round nose pliers
Flush cutters


1. Trace circles on felt using white pencil and your round objects. You will need four small and two of each of the other sizes.


2. Lay out circles to finalize pattern.


3. Glue various sizes of pom poms to circles using Fabric Fusion glue. If you make a small puddle of glue and dip the pom poms in, it makes quick work of this step. Allow to dry.

4. Reinforce outer edges of outer circles with a second small layer of felt, this will keep the felt from tearing when you wear the necklace. Allow to dry.


5. Turn circles over to determine placement of jump rings. Mark with fabric pencil. Rings need to completely connect each circle.

6. Use punch to place holes for jump rings. Make sure you aren't right on the edge of your circles to prevent felt from tearing when you wear the necklace.


7. Connect the felt segments using your jump rings and 2 pairs of chain nose pliers.


8. Attach a lobster clasp to the jump rings on the outermost circles on your bib section. Connect chain to clasps.


9. To make matching earrings, thread a head pin into the center of a small pom pom, coil and loop on each end. Attach this to an ear wire and a pom pom circle with jump ring. Repeat for second earring. (For more information on the basic jewelry making techniques in this project , please visit my YouTube channel and look for my Crafty Quickies videos!)

Wednesday, July 21, 2010

ILoveToCreate Teen Crafts Sweet Dreams Throw Pillow by Avalon Potter


ILoveToCreate Teen Crafts

Sweet Dreams Throw Pillow
Copyright Avalon Potter
"Kid crafted, mom approved."

I am quite positive that I gave birth to the world's best kid 12.5 years ago. My lovely daughter came home from camp today knowing that I'd been away for nine days at a medical center and was feeling worn down and under the weather and she jumped right in and made this FABULOUS project. She even took the step by step photos! Way to go, Avalon!

We bought the blank throw pillow several weeks back and she had a crafty plan. I decided not to direct her vision, but to allow her to create a design that was entirely hers. Okay, so I did suggest using felt for the facial features...but other than that and a little help with cutting the eyelashes, this is all Avalon. The companion piece is a creation by monster maker Jenny Harada.

Kids will amaze you if you let them. I think that's the key to great teen crafts. Instead of asking them to make the same thing you did, giving them tools to express their individuality and creativity challenges and empowers them. ILoveToCreate has an arsenal of tools to fuel their creativity and there are a host of fabulous ideas on the website for inspiration. Gather some up and step back and let your teens express themselves.

Materials
Blue cotton throw pillow (Target)
White craft felt
Fuchsia craft felt
Black craft felt
Aleene's Fabric Fusion Glue

Tools
Fabric friendly scissors
Sizzix Big Shot die cutting machine
Sizzix Bigz Die Wedding Flower

1. Use Big Shot and die to cut 8 flower centers from white felt. If you cut small sections of felt, you won't waste any in the die cutting process.

2. Cut out lips and lip center line from fuchsia felt.

3. Cut out eyelashes. Use scissors to cut into felt and create lashes.

4. Glue flowers to pillow.

5. Glue lips and eyelashes to pillow. Allow glue to dry.

Tuesday, May 25, 2010

ILoveToCreate Teen Crafts: May Flowers Embellished Tank Top


IloveToCreate Teen Crafts
May Flowers Embellished Tank Top

Margot Potter

“Mom crafted, kid approved.”

Summer is almost here and it’s time for tank tops, flip flops and shorts. Yippee! Here’s a fun project teens can do in the back yard with their friends. Just buy a bunch of inexpensive tanks or t’s and give them a pile of Tulip 3D Fabric paints andTulip Fashion Graffiti Big Phat markers and let them make their own wearable works of art. This isn't a 'make it perfect' kind of project, it's meant to be playful, so don't worry about coloring inside of the lines.

My color palette and design were inspired by the charming new graphic buttons from La Mode. Tulip fashion paint comes in virtually every color so it’s easy to match the button colors. I had so much fun with this; I think I’m going to have to make one for myself!

Materials
Cotton tank top (pre-wash to remove sizing)
3 Blumenthal Lansing La Mode buttons
Tulip 3D Fashion Paint poppin' purple, deep turquoise, yellow and clover green
Tulip Fashion Graffiti Big Phat fabric marker black
Aleene’s Fabric Fusion glue
Coordinating DMC Color Infusions embroidery threads

Tools
Embroidery needle
Paint brushes
T-shirt form

1. Slide a t-shirt form under your tank top. (Secure the back with safety pins to tighten if the shirt is too loose.)

2. Using the button pattern as inspiration, paint three flowers with graduated circles of color in pink, teal and yellow. Change the brushes out between colors. Allow paints to dry.

3. Use the marker to draw graphic circles to define the flowers. Draw stems and add leaves. Use green paint to color inside of leaves. Allow to dry.


4. Glue buttons to center of flowers. Allow glue to dry.

5. Add embroidery thread accents to each button, one yellow, one teal and one pink.

Tuesday, May 18, 2010

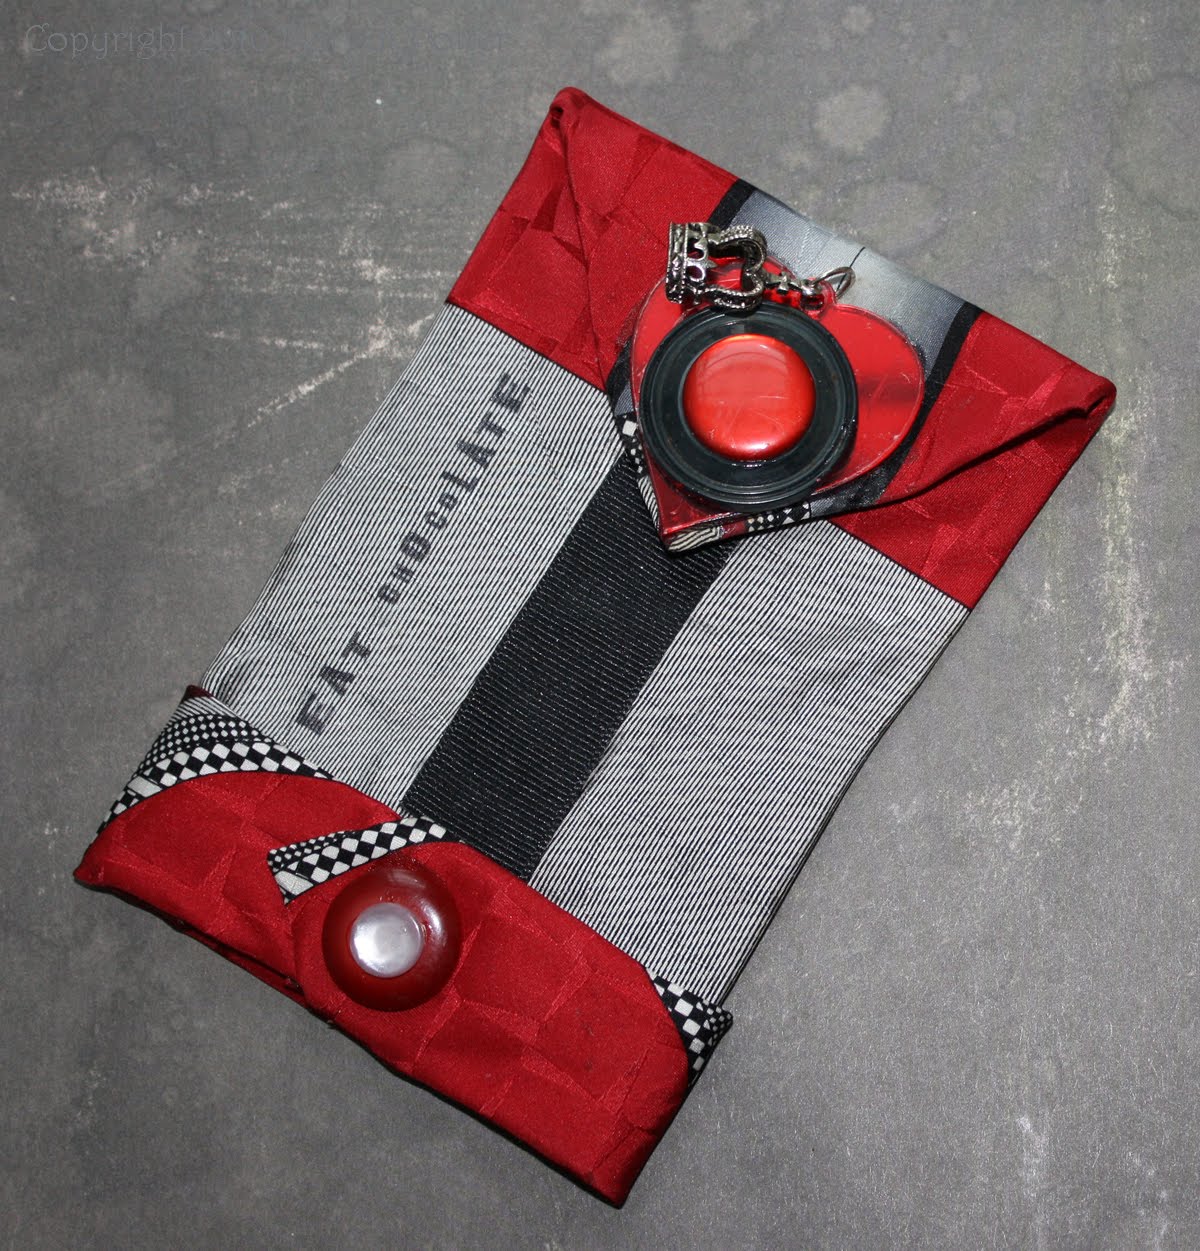
ILoveToCreate Teen Crafts: 'Let Them Eat Chocolate' Tampon Case


ILoveToCreate Teen Crafts
'Let Them Eat Chocolate' Tampon Case
Copyright 2010 Margot Potter
"Mom crafted, teen approved."

My husband and I used to own a gallery where we sold a variety of fair trade handicrafts, jewelry making supplies, vintage clothes and fun gift items. One of the items we carried was a wonderfully subversive Tampon Case created by an innovative young fella named Vinnie. Vinnie and I spoke a few times over the phone and I told him I'd love to see a more girly version. So I made a pink and felty one for my second book The Impatient Beader Gets Inspired (there's a pic below this post of that case.) My embroidered tampon case almost didn't make it into the book, but I fought for it and it stayed. Here's a new upcycled version made for the eco-conscious young lady who needs a stylish place to keep her feminine hygiene products and prevent them from getting destroyed at the bottom of her purse or book bag.

I'm of the mind that we need to be a little less weird about these things. Girls have periods. Got a problem with that?

Get over it.

So here's one for the girls! Being a girl is the best thing going. We should celebrate every aspect of what it is to be a girl and not be ashamed or afraid or uncomfortable. It's up to us moms to help our teens do that. This is a great project to do together and you can find fabulous old ties at the thrift stores for pennies. Aleene's Liquid Fusion glues turn this into a no sew project! Ya gotta love that. You can use the skinnier ties for iPod and cell phone pouches too. Vintage ties also make super cute skirts, bib necklaces, lamp shades, accents on purses...so get thee to the thrift store!


Materials

Vintage Tie (for this project a wider tie works best)
Coordinating Buttons
Large Heart Shaped Acrylic Charm
Metal 3-D Crown Charm
1" thick black grosgrain ribbon
Snap
Thin cardboard
10mm SP jump ring
Aleene's Fabric Fusion Glue
Aleene's Liquid Fusion Glue
Archival ink jet black
"Eat Chocolate" stamp Inkadinkado Amy Smyth 97479-MM

Tools
2 pairs chain nose pliers
Wire cutters
Chasing Hammer
Snap Setter
Steel Bench Block
Bench Block Pad
Disposable nail file or sand paper
Fabric Scissors
Crop-a-dile or 1/16" hole punch


1. Find a tie that's wide enough to create a sizeable pouch. You'll need to determine your needs based on the products you use. Measure tie taking into account a hem at the bottom and cut.


2. Use a seam ripper to open center of tie. Trace body of tie (not including top flap) on a thin cardboard or thick card stock.


3. Insert card stock into body of tie, cut off any excess card stock.


4. Fold bottom edge of tie and add a line of Fabric Fusion glue. Fold flaps over and add glue to secure. Add glue along seam of tie to secure closed.


5. Measure and cut bottom end of tie to wrap around bottom of pouch. Use Fabric Fusion glue to secure closed.


6. Attach snap to top of tie and corresponding area on pouch so it can be secured closed. I used a steel bench block, chasing hammer and bench block pad with the setting tool that came with the snaps.


7. Cut off and sand flush any shanks on the backs of your buttons using wire cutters. Glue layers of embellishments together with Liquid Fusion. Allow to dry. Glue to fabric surrounding snap using Fabric Fusion. Allow to dry. Add a second layered button accent to bottom tie flap on pouch with Fabric Fusion (see finished photo above.)


8. Use stamp and ink to stamp "eat chocolate" sideways on body of pouch. Allow to dry.

9. Glue a length of ribbon tucked into the tie accent at the bottom along the center seam to hide it.

Auntie Flo's Pretty Little Tampon Case from The Impatient Beader Gets Inspired
(Use Aleene's Fabric Fusion to glue layers after adding embroidery floss edges)

Tuesday, March 16, 2010

ILoveToCreate Teen Crafts: Anchor's Away Necklace T-Shirt


Anchors Away T-Shirt
Margot Potter for ILoveToCreate Teen Crafts
“Mom crafted, kid approved.”

I have a long standing love for all things nautical and am a particular fan of the French sailor look. I’ve been wearing variations of it for years. Avalon and I went shopping this weekend and she kept fawning over necklace embellished t’s and stripey sailor style tops. Thusly these concepts came together and this idea started formulating in my creative noggin.

You can change this up to suit your style and ditch the nautical theme for a rocker tattoo inspired look or a prim and proper girly look with flowers and pearls. You’ll just need a pre-made stencil (check out the Tulip Fashion Graffiti line) or a permission free image you can size and print to create your own. Tulip fabric paints and Aleene’s Fabric Fusion will help bring your idea to life. Then just sew on some jump rings and attach some chains to make a removable faux necklace look.


Materials
Striped Cotton T-Shirt Pre-Washed
Permission Free Anchor Image sized to fit scale of shirt
Tulip Slick Red Fabric Paint
Folder or thick cardstock for Stencil
Aleene’s Fabric Fusion
Sewing thread (I used red to match the anchor)
Beadalon SP Rolo Chain
2 Swivel Lobster Clasps
3 SP 10mm jump rings
2 SP 6mm jump rings
Scrapbook Adhesives EZ-Runner Tape Runner
Offray Nice and Narrow black satin ribbon with polka dots

Tools
Craft Knife
Cutting Board
Foam Brush
Sewing Needle
Sewing Scissors
2 Pairs Chain Nose Pliers

1. Select image. If you are making your own stencil, size it to fit scale of shirt. Print image.

2. Attach image with EZ-Runner to thick cardstock or a manilla folder. Use craft knife to cut out stencil.
Leave a bar or two around the anchor hole at the top so you don’t lose that hole when you stencil.

3. Use foam brush to stencil image on shirt on the left side. Allow to dry. Remove stencil.

4. Create a tiny bow and adhere to top of anchor with Aleene’s Fabric Fusion. Allow to dry.

5. Sew the large jump rings to the top seams on either side of the neckline of your shirt. Sew a third large jump ring to the top of the anchor on the left side of shirt.

6. Drape chains to find best length and attach the ends to lobster clasps on both sides using a small jump ring and two pairs of chain nose pliers. Thread the longer chain through the jump ring at the top of your anchor.  Attach a second chain length that is slightly shorter to the jump ring at the bottom of your clasps. Remove chains when washing garment.