Showing posts with label jewelry making. Show all posts

Friday, March 4, 2011

Anchors Away, Dahlings!

Sailing, Sailing Jewelry Set Copyright Margot Potter for Jewelry Television's Jewel School

Christian Dior Spring 2011

Many of you know that I have a long standing affection for nautical themed fashions. I can't say what it is about stripes and sailor pants that makes me so endlessly happy, but perhaps it is tied to my love of the ocean.

Nautical looks are hotter than ever this season and I made this swingy little necklace using QuickLinks, Artistic Wire, freshwater pearls and faceted blue goldstone beads all from Jewel School at Jewelry Television.

You can get the step by step instructions here at the JTV Blog!

Anchors away, dahlings.
(Click on the button to see the FAB projects from a bevy of talented crafters in this month's Fave Crafts Blog Hop!)

xoxoLink
Madge

Saturday, January 22, 2011

How to Make Your Own Wire Jewelry Hooks-Video on Demand for Jewel School

It's Teeny Tiny Madge Blowing a Kiss!

Hey There Boys and Girls

It's time for this week's Video on Demand for Jewel School! Follow this link to watch! This week I show you how to make your own wire hook clasps. Note: to make an s-hook you can mark the center of the wire as a guide so the two sides of the 's' are equal. I mentioned that but things have to get cut or these videos would go on forever! I do everything by eye, but that's not always the best way when you're starting out.

Enjoy and tune in next week, we've got a fun wire twister and jump ring maker project!

xoxo
Madge

Friday, January 14, 2011

New Jewel School Video: Making Earring Wires

Teeny tiny and highly animated Madge is perhaps a little too excited about earring wires!

Have you ever made your own ear wires? It's so easy! Just use a half hard 20 gauge wire and a few key tools and in moments you can create custom made earring hooks and hoops. In this week's video tutorial for Jewelry Television's Jewel School I show you how.

Just follow this link to watch the video.

You'll never have to buy pre-made earring findings again! Huzzah!

Cheers
Madge

Monday, January 10, 2011

Snow Day.


It just keeps snowing...

Finally, a snow plow!

We are having another snowstorm here in East Tennessee and I'm really starting to feel the weight of winter. I had hoped that moving South would mean less snow, less cold, more sunshine and less wintertime blah. Alas and alack, so far not so much. It's a freakish year for weather here and I'm wondering if the snow has plotted to follow me wherever I go. The good thing about that winter blah is that it forces me to focus on creative ideas. It starts with some little fragment of a concept that starts tapping at my brain and if I follow it amazing things happen. I don't always have the time, given the amount of projects I now need to create in a given week, to follow the threads of these bigger ideas and see where they lead. This weekend I followed and they led me to create a bib style necklace of crystal and wire butterflies in a wide array of colors constructed from over 1500 crystals. It took 1.5 days and I'm not finished. I still have to connect them all together as they are precariously placed on top of an old wooden crate in my living room. Will I use shaping wire or jump rings? Which will provide the best structure but still allow for movement? Will this be uncomfortable to wear? Stay tuned...after the shows there will be pics!

I can be surprisingly patient when I become obsessed with any idea.

I'm playing with French beaded flower techniques, but I don't want to just follow a pattern. In case you haven't noticed, that's simply not my style. I'm trying to take the techniques and adapt them. So far, so good. I've got a second Mid-Century modern inspired crystal and wire jewelry set to begin today and then I need another show stopper design for CHA and Tucson. These will eventually become tutorials for JTV, so hang in there. I'm hoping to get the Jewel School customers to explore some fresh creative directions and that requires a lot of trial and error on my part.

Sometimes I feel as if I'm running so fast to keep this blog and the social networking sites going, to make the deadlines for my new job and to stay relevant when the amount of content on jewelry making and crafting on the internet is becoming overwhelming. It's just so much work and the traffic numbers go up and down and I start to feel as if I can't really keep up, especially when I'm not even sure if it matters. At what point does it all just turn into white noise?

Is this thing on? Hello?

I'm diving back into my imagination today and hopefully that defiant creativity will help push back those winter blues. Hopefully this little blog serves a purpose and stands out in the fray, and even if it does not it brings me joy to share my creative journey with others.

Until next time...craft on with your bad selves! Madge has reached her allotment of 'I's' for this post. Sheesh.

xoxo
Madge

Thursday, August 19, 2010

Free Jewelry Making Project #3 from Bead Chic by Margot Potter


Did you know how easy it is to create your own findings? Once you master that skill, you'll find it difficult to buy them ready made! This project from my new book Bead Chic shows you how to create some longer bent and curved ear wires. You can opt to use base metal instead of sterling, but definitely use a 20 gauge wire made from stainless or another more sturdy metal and make sure you sand or use a wire rounder on the ends. I used a rat tail comb to create the sharp bend...I'm of the mind that you use what you have at hand!

I called this design 'Effortless Elegance' because it's just a few lovely beads and an artfully bent wire. This is from the chapter on Pattern and the variation is a little more complex with some hammering of the front part of the ear wire and some simple wire wrapping on a QuickLinks component. You could wrap beads on the front part of the ear wire...or add coiled wire...or add a bead or two...see how this keeps shifting if you make small changes? That's what this book is all about! You'll need to buy the book to get the step by step photos.

If you leave a comment here, I will select one of you to win a signed copy of the new book and a bonus swag sample. I'll announce the winner next Saturday August 28th.

Good luck!

Cheers,
Madge

Effortless Elegance Earrings Copyright Margot Potter 2009

Effortless Elegance Earrings
Bead Chic
Copyright Margot Potter ALL RIGHTS RESERVED

Materials
2 12x17m black onyx polished tear drop beads
6 3mm red coral beads
6 24 gauge sterling head pins
2 ball tip sterling head pins
20 gauge sterling wire

Tools
Round nose pliers
Chain nose pliers
Thin metal dowel (I used metal end of a rattail comb)

1. Cut off two 3” segments of wire.

2. Bend wire over a thin dowel to create a crease or point, this should be not quite in the center of the wire and in the same spot on both wires.

3. Gently round both wire tails into a matching curve.

4. Sand ends of wire.

5. Bend a loop in one end of wire using round nose pliers.

6. Create wrapped dangles using ball tip head pins and onyx beads. Repeat for coral beads using regular head pins.

7. Attach beads to loop at end of ear wire onyx first followed by three coral beads. Use chain nose pliers to open and close loop.

Monday, August 16, 2010

Free Mixed Media Jewelry Project: Shakespeare's Garden for Art Beads


Shakespeare's Garden Necklace by Margot Potter for Art Beads ALL RIGHTS RESERVED

View Two Shakespeare's Garden by Margot Potter for Art Beads ALL RIGHTS RESERVED

I received an email while I was in Cincy from the fine folks at Art Beads that a tutorial I'd created for them a while back is live on their site! The necklace above is called Shakespeare's Garden and it features beaded wire circles and stamped resin pendants in a whimsical and sculptural design. What I love most about this is that these circles have dimension, but also fluidity because the wire underneath is not stiff.

I've been playing with these beaded circles for several years and every time I think, we'll that's about all you can do with those, another idea pops into my head. I do love to explore a theme and the circle is such a powerful, archetypal and cross culturally relevant symbol. Endings and beginnings and the journeys we take come around and around and around. Each of us a point on the sacred hoop making our own unique way to the center of higher understanding and universal love. Even Einstein once postulated that if we stood staring into space and could see to the farthest reaches, we'd eventually see the back of our own heads. Round and round and round she goes...

Powerful stuff, that circle. And as for Shakespeare, I've had the pleasure and the privilege of playing some of his greatest female characters...including Viola from Twelfth Night.

If you follow this link, you can get the full tutorial with step by step photos for this design. Enjoy!

"O Mistress mine, where are you roaming?
O, stay and hear; your true love's coming,
That can sing both high and low:
Trip no further, pretty sweeting;
Journeys end in lovers meeting,
Every wise man's son doth know.
What is love? 'Tis not hereafter;
Present mirth hath present laughter;
What's to come is still unsure:
In delay there lies not plenty;
Then, come kiss me, sweet and twenty,
Youth's a stuff will not endure.
"
William Shakespeare-Twelfth Night

Love
Madge

Thursday, August 12, 2010

Free Jewelry Project #2 from Bead Chic by Margot Potter


It's Week #2 of the four week bonus Free Projects from my new book Bead Chic! Here's the one from the Make Jewellery feature I showed you last week. You'll need to get the book for the step by step photos.

Enjoy!

Leave a comment for a chance to win a free signed copy of the book!

If you left a comment last week, stop in on Saturday to see if you won, I'll announce this week's winner next Saturday!

Cheers,
Madge

(Image copyright Margot Potter 2009)

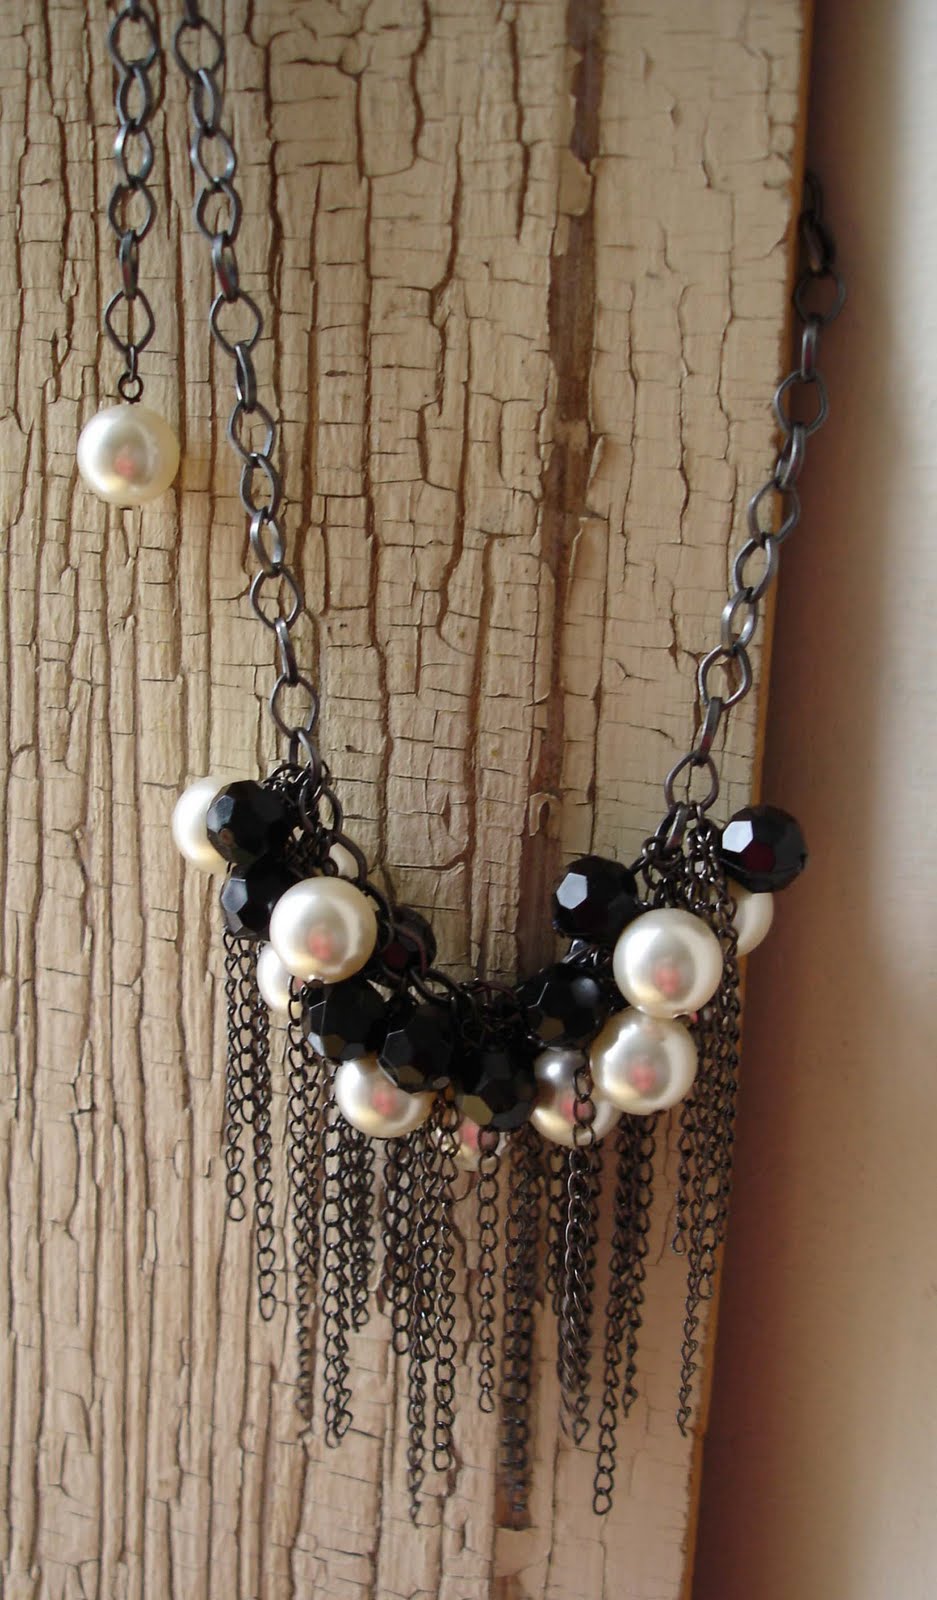
Chaos in Pearls Necklace
Bead Chic
Chapter One: Scale
Copyright Margot Potter and North Light Books
ALL RIGHTS RESERVED

Crystal pearls, faceted plastic rounds and gun metal chains are clustered in a chaotic mass at the front of this daring, delightful and decidedly different necklace design. The less you map this one out, the better. You can opt to vary the chain lengths even more dramatically to give this an ‘haute couture’ design flavor.

Materials
13 8mm black plastic faceted rounds
14 12mm SWAROVSKI ELEMENTS cream pearls
39 1.5-3” lengths small gun metal curb chain
18.5” section gun metal oval rolo chain
27 gun metal head pins
1 large silver plated swivel lobster clasp
15 4mm gun metal jump rings

Tools
Round nose pliers
2 pairs chain nose pliers
Wire cutters

1. Cut 39 1.5-3” sections of small gun metal chain.

2. Create looped dangles for every pearl and faceted round.

3. Cut an 18.5” section of rolo chain. Attach a pearl to one end using a jump ring.

4. Attach the lobster clasp to the other end using a jump ring.

5. Starting on the 32nd link in your chain, attach a pearl, a faceted round and three varied lengths of small chain with a jump ring to the link.

6. Move down every link and continue attaching a pearl, a round and three varied lengths of chain on a jump ring. There are 13 pearl, round and chain combos.

Wednesday, August 11, 2010

ILoveToCreate Pink Splash 3-D Flower Bangle


ILovetoCreate Teen Crafts Pink Splash 3-D Flower Bangle
Copyright Margot Potter
“Mom crafted, kid approved.”

I designed a chain and bead necklace a couple of years ago featuring a similar hot pink die cut flower on it for a class proposal. At the time, this kind of look hadn’t hit mainstream fashion hard and I think it was just a skootch ahead of the curve. Flash forward to 2010 and dimensional floral accents are EVERYWHERE! I’ve re-imagined it attached to this pretty painted pink bangle design using fabric paints, fabric markers and Aleene’s Liquid Fusion glue. I think this is one of those perfect ‘Back-to-School’ accessories for the teen fashionista. It’s flirty and fun and girly and right in step with what’s happening in the fashion mags.

PLUS the flower spins around like a pinwheel, so it’s a kinetic design too! When those crystals get spinning, it’s really quite mesmerizing!

This requires using an electric drill, so a little assistance from mom or dad may be required. You could opt to do smaller flowers and have them circle the wrist, but I’m a big and bold kinda gal and so is Miss Avalon, my resident teen. Take this idea where you like, express your individuality! That’s what crafting and fashion is all about.

Materials
Grungeboard sheet swirls pattern
Tulip Soft Fabric Paint in azalea
Tulip Metallic Dimensional Fabric Paint in white
Tulip Metallic Dimensional Fabric Paint in metallic silver

DIY Bangles small wooden bangle
Inkadinkado lourish stamp
Aleene’s Liquid Fusion glue
Tulip Glam-It-Up™ crystals
Crystal bead for center
Pink or silver-plated head pin
Sizzix Bigz Flower Die

Tools
Tulip Glam-It-up™ tool
Sizzix Big Shot machine
Electric drill with 1/16” bit
Paintbrush
Foam brush or foam applicator
Flush cutters
Round nose pliers


1. Paint several layers of azalea paint on inside and outside of bangle. Allow to dry between layers.

2. Stamp flat oval areas with flourish stamp and white paint. Apply paint with a foam applicator or brush to surface of stamp. Allow to dry.

3. Mark center of one flat oval segment on bangle and drill.

4. Die cut flower out of Grungeboard using the Big Shot and the Bigz flower die.

5. Paint both sides of each layer of flower with azalea paint. Allow to dry.


6. Use foam applicator and flourish stamp to apply metallic silver paint to surface of flower layers. Allow to dry.

7. Use a thin paintbrush or your foam applicator to edge the flowers with the metallic paint. Allow to dry.

8. Glue flower layers together with Liquid Fusion. Allow glue to dry.

9. Use Tulip Glam-it-Up crystals and wand to apply crystals to edges of flower petals.

10. Thread head pin with flat side facing inside of bracelet through drilled hole, hole in center of flower and a crystal bead. Use round nose pliers to turn a loop and secure. (If the head pin head is too small, use a small button to secure it to the back of the bracelet.)

Friday, August 6, 2010

Madge Goes Global

Copyright Make Jewellery Magazine and Margot Potter for North Light Books
ALL RIGHTS RESERVED (pardon the scan, this is an extra large magazine!)

Imagine my surprise and chagrin while leafing through Make Jewellery magazine from the UK and spotting a full page feature with a project from my new book Bead Chic! I did a double take, a Danny Thomas coffee spit take and let out a gleeful little giggle.

Okay really I just said, "Hmmm...that project looks familiar"...and let out a gleeful little giggle.

The rest was just what you might call, artful embellishment.

I'm a Leo, we like to decorate everything. Yay for international press! Yay for people who buy my new book, I heart you! Yay for my birthday month! Yay for exclamation points!

Yay for too many cups of coffee!

Love
Madge

Wednesday, July 28, 2010

ILoveToCreate Teen Crafts: Playful Pom Pom Necklace


ILoveToCreate Teen Crafts
Playful Pom Pom Necklace
Copyright Margot Potter
"Mom crafted, kid approved."

Pom poms have a habit of proliferating in my studio. I just keep buying big bags of them with vague thoughts of projects to come. This idea has been rolling around my brain for a while now and yesterday, with a lot of help from my wonderful husband, this necklace was born. Kooky? Yes, yes it is. Fabulous? Well, of course! It's also lightweight, soft and fluffy. It's not for stuffy, stodgy, conservative folks, this is for the teen with a sense of fun. Much like the designer, who, while not a teen, likes playful accessories with a heaping helping of whimsy.

This is so easy and fun to make and you can take it in so many directions. Pom poms come in all sorts of sizes and colors, so if neon isn't working for you, change up the color palette! A nice black and white story would be striking! These pom pom circles can decorate purses, t-shirts, jeans, headbands, flip flops...where you put them is entirely up to you. After trying this on, I added a final layer of pom poms to the back of the earrings. So you can decide how you prefer to wear it. I'll be sporting this at CHA (a big craft trade show I'm attending this week) and Avalon will take it over afterward. She thought it was adorable and her opinion, as a stylish and fashion forward teen, is the one that counts. This is so affordable, so easy and so fun to make, it's the perfect antidote to the mantra of summer, "Mom...I'm bored."

Materials
Black craft felt
Multiple sized neon pom poms
Aleene's Fabric Fusion glue
11 10mm silver plated jump rings
QuickLinks Oval Chain
2 silver plated swivel lobster clasps
2 silver plated ear wires
2 2" silver plated head pins
(all jewelry making supplies and tools provided by Beadalon)

Tools
White fabric tracing pencil
3 round objects (1.5", 1.75" and 2" diameter)
Fabric scissors
Crop-a-dile or other 1/16" hole punch
2 pairs chain nose pliers
Round nose pliers
Flush cutters


1. Trace circles on felt using white pencil and your round objects. You will need four small and two of each of the other sizes.


2. Lay out circles to finalize pattern.


3. Glue various sizes of pom poms to circles using Fabric Fusion glue. If you make a small puddle of glue and dip the pom poms in, it makes quick work of this step. Allow to dry.

4. Reinforce outer edges of outer circles with a second small layer of felt, this will keep the felt from tearing when you wear the necklace. Allow to dry.


5. Turn circles over to determine placement of jump rings. Mark with fabric pencil. Rings need to completely connect each circle.

6. Use punch to place holes for jump rings. Make sure you aren't right on the edge of your circles to prevent felt from tearing when you wear the necklace.


7. Connect the felt segments using your jump rings and 2 pairs of chain nose pliers.


8. Attach a lobster clasp to the jump rings on the outermost circles on your bib section. Connect chain to clasps.


9. To make matching earrings, thread a head pin into the center of a small pom pom, coil and loop on each end. Attach this to an ear wire and a pom pom circle with jump ring. Repeat for second earring. (For more information on the basic jewelry making techniques in this project , please visit my YouTube channel and look for my Crafty Quickies videos!)

Thursday, July 15, 2010

Bead Chic is HERE!


IT'S HERE! MY NEW BOOK IS HERE! I was a little surprised in between doctor appointments here in Denver at National Jewish Hospital when I discovered that Bead Chic is out! If you'd like a chance to win a free copy, leave a comment here. I'll pick two winners next Thusday! Or you can head over to Amazon and get a copy ASAP! Stay tuned for some free projects and more prizes when I get home!

It's been hectic, scary, weird and wonderful here. I'm hopeful that I'll return with some concrete answers and pathways to getting my breath back. My mom is here to support me, which has been really tremendous of her! I'll have a full report when I return next week.

Love
Madge

Tuesday, July 6, 2010

Update from Studio Madge

Image from Wikimedia Commons by Mathematica Details under a Creative Commons Share Alike 3.0 License

My straw pile has grown exponentially. I am quite certain there is circus music playing in the studio. I have a week to finish the bulk of my book and then a lot of looming travel that is going to keep me away from the studio. It's turning out to be another crazy summer. I am hopeful for a lazy summer next year...

I've completed 28 of the 30 core projects and I need to whip up 2 more. Then I need to create 9 more variation projects (I've completed six), finish the step by step instructions, write the chapter openers, write the tools and materials information and plan the techniques section. Then it's a matter of mapping out and packing up materials for the step by step shoot in August and getting it all to the publisher by July 30th. Plus there's Bead Chic coming out at the end of this month and the PR blitz I need to work out for that and the looming trip to CHA... Ah to have more hands and more hours!

On top of that we have a variety of other wacko things happening behind the scenes here and I know you all know I've been stressed to the max recently. Though folks around me seem convinced it will all work out, I can't be sure of that until I'm sure of that. It's complicated.
Breathing deeply...

I'll be back tomorrow with another fun Teen crafts project for ILoveToCreate. Until then...if you're as hot as we are around these parts...stay cool or if not, take that figuratively!

xoxo
Madge

Sunday, July 4, 2010

Happy Independence Day!

It's Independence Day here in the US and I'm trying my best to relax and enjoy, though that darned straw pile is ever present. Here's a video from my appearance last year on The Balancing Act with the lovely Ms. Kathy Peterson. I share a super simple and simply fabulous bracelet featuring Beadalon wire and SWAROVSKI ELEMENTS crystals. You can adapt this project to suit any day of the year as you'll see when you watch!

Happy 4th of July!

Love
Madge


Thursday, June 10, 2010

Do You Wanna Know a Secret?

Blackbeard's Bounty Necklace Copyright Margot Potter from Bead Chic

One of the hardest parts about my job is that I can't really share much with you. Since I don't sell my finished pieces at retail, I have to keep them under wraps until publication. That means I'm often working a year in advance. I can keep a secret, but it's not always easy! I get so excited when I'm creating new pieces.

I can't tell you what my next book is about, I can't show any of the designs I'm creating...it's a lot of Top Secret stuff around Studio Madge. If I share pictures or concepts, I risk someone taking those ideas and beating me to the punch. I can only blame myself if that happens simply because I couldn't keep it under wraps. Once you've put it out there, it takes on a life of it's own. That's the hardest part of designing and sharing your work on the internet. It's so easy for people to right click, save images of designs they like and then forget where they found them. Once you see an idea, it's easy to absorb it and later use it in your work without even recalling that you've seen it before. And then, most unfortunately there are those who just think the internet is a great big free for all and anything they see is fair game. It is what it is and even though it stinks sometimes, my job as a professional designer is to protect my ideas.

I keep my cards much closer to my chest these days than I used to. That being said, I'm so excited that I can finally share some pieces from my new book Bead Chic, here's one of my favorites. I called this necklace Blackbeard's Bounty. It's a tangle of gun metal chain, SWAROVSKI ELEMENTS pearls with a Green Girl Studios skeleton key hanging down the back. Yummy.

I'm going to offer free projects and book giveaways as we get closer to publication. So stay tuned. It's fun to finally be able to share with the class!

Cheers,
Madge

Monday, May 17, 2010

Serpentine Earrings

Serpentine Earrings Copyright 2009 Margot Potter

Here's a quick and easy elegant earring design I created for Beadalon I called Serpentine. You can get the step-by-step instructions here.

You can easily whip these puppies up at a moment's notice in a variety of color combos and bead configurations. If you're an "impatient crafter" like me, this is your daily dose of instant gratification!

I'm not feeling very musing motivated today, so Madge's Monday Musings will return next week. Let's just say I had a lovely weekend and I'm really missing it already!

Cheers,
Madge

Monday, May 10, 2010

Madge's Monday Musings

I had a lovely Mother's Day with my family. I was treated to breakfast in bed with mimosas and a huge, warm, gooey, sticky cinnamon bun. Talk about a sugar rush! Yum! It felt good to unplug and be with my family. I really needed that.

I was starting to feel overwhelmed. It's easy to feel that way when you do as many things in one day as I do and you have so many people contacting you, pulling at you, watching you. Sometimes I think I'm paranoid, until weeks like last week. Is it just me, or is it really weird when people you barely know from your industry start 'friending' your old friends from college and High School on social networking sites? It just starts to feel like you're being stalked. Insert Alfred Hitchcock Psycho music here.

I'm all for the fine art of shameless self promotion, but there have to be some limits. If you don't actually know my old friends, perhaps you should ask for an introduction first before you arbitrarily friend them and start leaving personal messages on their walls. I mean...back off a little, will ya?! Most of them could give three hoots about crafting, trust me.

So here it is, Monday, and I've got to get that spinning wheel greased up and dive back into that straw pile. Lots to do this week!

Here's a stylishly simple project I created for a manufacturer that didn't make their cut, but I quite like it. I called this one Fashionista. The pendant is from Auntie's Beads and the orange beads are actual sunstone, not the faux kind you usually find at bead stores. This one has a lovely earthy palette and I can't stop adding bows to everything these days. Bows and fabric flowers. I'm obviously feeling girly!

I'll be back tomorrow with a free teen craft project for ILoveToCreate! Until then...craft on with your bad selves.

Cheers,
Madge

Thursday, May 6, 2010

Jewelry Making Daily


I usually save all of my links for Saturday's post, but this week I'm making an exception. Jaime Guthals of Interweave Press asked me to share some exciting news with you. If you're a jewelry maker, you're going to like this! Interweave has just launched a new internet platform called Jewelry Making Daily. It's an online community, a social networking site for jewelry enthusiasts if you will. There are blogs, magazines, galleries, videos and shopping along with forums where you can chat with other folks who share your passion for all things jewelrycentric. Once you become a member, you'll have access to their other multiple niche focused communities in knitting, quilting, crochet, beading, mixed media...it's a virtual cornucopia of crafty goodness! Go check it out!

Interweave has added some exciting new bead and jewelry making shows to the mix, you can find out about that here.

I've got a rather large straw pile to spin and I'm still not at half of my usual energy. So I'm afraid I must away! Until next time...craft on with your bad selves.

Cheers,
Madge

Tuesday, April 27, 2010

ILoveToCreate Teen Crafts: Sparkle and Shimmy Earrings


ILoveToCreate Teen Crafts: Sparkle and Shimmy Earrings
Margot Potter for ILoveToCreate
“Mom crafted, kid approved.”


Avalon just got her ears pierced this year, so it will be a while before she can wear anything that swings and dangles.  Still she’s been observing my jewelry box with a glint in her eye. Teens love bold jewelry and these earrings fit the bill.

These feature the new Katiedids™ components my friend Katie Hacker created for Beadalon. They have empty chambers that can be filled with a variety of items. I don’t know why I thought wired tinsel when I saw these, but Aleene’s Platinum Bond Glass and Bead adhesive made quick work of this project. You can whip these puppies up in twenty minutes or less, which is the perfect project if you’re an impatient crafter like me! Try filling the chamber with fibers, crystal chain, regular chain, gemstone chips...just be sure you thread the head pin through so you can turn them into fun jewelry components.


Materials
Aleene’s Platinum Bond Glass and Bead Adhesive
4 Katiedids™ 1” open center circles
2 10mm black faux pearls
2 10mm acid green moonglow Lucite rounds
Wire sparkly tinsel
2 silver plated or sterling ear wires
4 thin gauge silver plated or sterling head pins

Tools
Wire cutters
Round nose pliers
Chain nose pliers


1. Cut tinsel to fit half of chamber. Repeat four times.


2. Thread the wire through the holes in the edge of the components and the center bead and back through.
For the green beads, you need to leave equal amounts of wire exposed on both sides, for the black beads bring the head pin flush to the bottom of the component.


3. Place a thread of glue into one of the components. Gently place tinsel into glue, compressing into chamber on either side of center head pin, repeat with second piece of tinsel. Repeat for all four components. Allow glue to dry.

4. Use round nose pliers to create loops at the top and bottom of both green bead components. Bend wire flush to component at a 90 degree angle, grasp wire end with round nose pliers and form a loop. Cut off excess wire with wire cutters.

5. Use round nose pliers to create wrapped loops at the top of the two pearl components. See my YouTube Channel for a video on how to do this.

6. Attach pearl components to the bottom of each green component. Attach the ear wires. Adjust loops so earrings hang properly.


Thursday, February 25, 2010

Free Mixed Media Jewelry Project: Crocheted Wire and Crystal Necklace for Beadalon

Crocheted Wire and Crystal Necklace Copyright 2009 Margot Potter for Beadalon

I taught a class at CHA on basic bead embellished wire crochet, with a twist. I figured out how to add beads without having to have them loaded on the wire and slide them up for every stitch, because that is far too tedious for this impatient crafter.  I've taken this idea in a lot of directions since I proposed this class and I'm really excited to finally share this simple technique with you. This project is posted in the Beadalon Blog today with full instructions, so I'm sharing the pics of the project here.  Just follow this link to get the instructions!


Until next time...craft on with your bad selves.

Cheers,
Madge

Wednesday, January 20, 2010

Book Review: A Bead in Time by Lisa Crone


Book Review
A Bead in Time by Lisa Crone
North Light Books
Copyright 2010

Lisa Crone has written an absolutely charming book for the novice beader in search of inspiration.  With a decidedly clever window to design, she focuses on the personal and that's the perfect way to entice readers to move beyond the copycat phase of jewelry making into exploring their own design eye.  Through inspirational photographs and objects mined from the experiences of her daily life, she shows the reader how to explore color, texture, pattern and motif.  This approach to design is right up my alley, my second book explored a similar concept using a variety of inspiration images and objects to guide the new designer into new pathways of creativity.  What I love about Lisa's approach to the topic, is the personal, memory inspired, storytelling focus.  In fact, I think it really quite brilliant.

Even if you're a seasoned designer, this book will offer you a fresh set of ideas to explore in your work.  The designs are all pretty, wearable jewelry and not so artsy that they'll overwhelm the wearer.  This is jewelry you'll reach for over and over again.  It's the kind of jewelry that garners compliments because it compliments you so completely. 

The photographs do a wonderful job of illustrating the concept and you can really see the jewelry which is important if you're trying to figure out how to reproduce it.  The photo stylist and book designer did a wonderful job of letting Lisa's work shine.  There are a surprisingly wide variety of techniques explored in the book and a wonderful cross section of materials.  Lisa dabbles in a little bit of everything here from basic stringing, to wire work, to macrame, to bead weaving, to exposed wire concepts and even a little taste of mixed media.  It's fresh and cheerful and a wonderful addition to any jewelry designer's library and I guarantee you'll be inspired and delighted.

Visit Lisa's A Bead a Day Blog for her regular dose of beady inspiration.

Until next time...craft on with your bad selves!

xoxo
Madge