Showing posts with label teen crafts. Show all posts

Wednesday, March 9, 2011

ILovetoCreate Teen Crafts: Edible Easter Centerpiece and Party Favor


ILovetoCreate Teen Crafts
Edible Easter Centerpiece and Party Favor
By Avalon Potter
“Teen Crafted, Mom Approved”

I love flowers, and especially Pink gerbera daises! I also happen to love jelly beans, parties, and crafts. I have always wanted to combine them all and with Easter on the way I thought of a perfect way to do it! This week’s project is an edible Easter center piece, with the delicious element of jelly beans and the adorable design of a pink daisy in a rick rack embellished pot!

Materials
Jelly beans
Cardboard
Styrofoam
Three colorful little buckets (we got these at Target in the dollar section)
Fake pink gerbera daises
Rick rack or colorful ribbon
Aleene’s Liquid Fusion Glue
Aleene's Foamtastic Glue

Tools
Scissors
Pen

Instructions

1. Gather all of your materials.

2. Wrap your ribbon around the base of the bucket to measure it and cut leaving a little bit of excess ribbon.


3. Apply a thin strip of Aleene’s Liquid Fusion glue to the backside of the ribbon and rewrap around the base of the bucket.

4. Repeat steps two and three for the top and bottom of all three buckets.

5. Measure the bucket width by drawing a circle on the cardboard with the bottom of the bucket. Then cut out the cardboard circle.


6. Take a chunk of Styrofoam and put it in the bottom of the bucket, then make a hole big enough for the flower stem in the cardboard. Add some Aleene’s Foam glue and slide the cardboard to the top of your foam.

7. Cut the flowers so that they fit in the pot making two the same size and the third taller.


8. Put the flower in the pot giving it a bend so you can see the flower face. Make sure the face is facing you.


9. Fill the pot to the top with jelly beans.

10. If you want to let your guests take these home, add a name on a card to the pot handle or the flower stem.

Wednesday, February 23, 2011

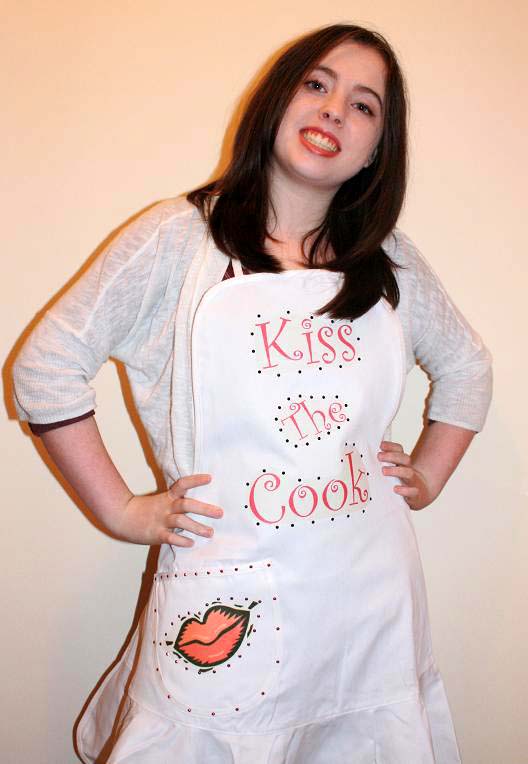
ILovetoCreate Teen Crafts: Kiss the Cook Apron


(Mom says, "Avalon does it again with this super cute apron! Am I a proud mom, you bet I am!")

ILovetoCreate Teen Crafts

Kiss the Cook Apron
Avalon Potter
"Teen crafted, mom approved."

Sticking with the baking theme, this weeks project is a “Kiss the Cook" apron! I love to bake and I was in need of an apron so what better way then to make my stylish chef couture into something everyone can wear. So stick that soufflĂ© in the oven and get to work!

Materials

Iron on transfer paper
Tulip Glam it Up Iron-on Studs
Apron (Preferably white)

Tools
Tulip Cordless Heat Setting Tool
Iron
Computer/Inkjet printer
Scissors

Instructions

1. Gather all of your materials.

2. Go onto your computer and chose the size and font of your letters in Microsoft Publisher or your program of choice.

3. Print it out onto the transfer paper. Make sure to follow the directions for printing and click on “mirror image” in the settings. I found the lips in clip art.

4. Heat up your iron to high and set your lips and words in a position you prefer.

5. Iron your words and lips to the apron. You might want a little help with ironing. On the first try the transfer burned. Actually my Dad did the ironing on the first one and burned Mom’s new kitchen table! (Mom here, "ARGH...can't I ever have ANYTHING nice? Wah, wah.") To protect the surface underneath put a pillow case or a cardboard t-shirt form under your apron while ironing.

6. Place the colored studs around the lips and words; bright pink around the lips, black around the words, and if you have a pocket or other major detail use red around it. Set the studs with the Tulip heat tool or your iron.


Wednesday, February 9, 2011

ILovetoCreate Teen Crafts: Cupcake Sparkle T

It's another fab Teen Craft Project by Avalon Potter for ILovetoCreate!

I Heart Cupcakes!


Cupcake Sparkle T
Avalon Potter for ILoveToCreate Teen Crafts

"Teen crafted, Mom Approved."


I love baking cakes and decorating them with fondant, but I also love making and eating cupcakes! Really, who doesn't love a cupcake? Tulip has these super cute iron on words and embellishments that make it so easy to customize a simple t-shirt to celebrate anything you love!

Ingredients
White T-Shirt
Tulip Glam it Up Iron-on Studs (pink)
Tulip Glam it Up Iron-on Fashion Designs Large Cupcake pack
Tulip Express Yourself Iron-on Applique Cupcake

Tools
Tulip Mini Fashion Iron
Tulip Cordless Heat Setting Tool

1) Large Cupcake Pack – cut the text “cupcake” from the pack and position it on the shirt in the desired placement with the plastic side up. Cover with a thin cloth and press and hold your iron for 45-60 seconds. After it cools remove the plastic.

2) Cupcake Applique – position the cupcake image with the design side up. With your iron at the cotton setting, press and hold for 30 seconds. Turn the shirt inside out and press again with the iron for 30 seconds.

3) Iron-On Studs – I chose the pink studs to match the color of the cupcake text. Position the first stud with the glue side down in the middle of the shirt collar. Use applicator to attach each crystal, one at a time to maintain positioning.

Remember to turn your shirt inside out when you wash it!

Tuesday, January 11, 2011

ILoveToCreate Teen Crafts: Volleyball Spirit Socks


Volleyball Spirit Socks
Avalon Potter for ILovetoCreate Teen Crafts
"Teen crafted, mom approved."

For my project this week I decided to create some knee high volleyball socks! I have recently been preparing for a volleyball tournament and when you play volleyball your uniform usually includes knee high socks. Instead of buying a pair of fancy socks, I decided to decorate them myself! It is fun and easy and is even better once you try them on. You can adapt this project to any sport or if you're not sporty, just for fun!

Materials
White knee socks
1” grey grosgrain ribbon
Pink Felt
Aleene’s Fabric Fusion fabric glue
Tulip dimensional fabric paint-slick black
Tracing pen
1” circumference circle template
Tube or rectangular form large enough to secure socks and hold their form


1. Place sock on form.

2. Take your pen and mark where you will put your volleyballs and bow on socks.


3. Take your circle cutout and trace it eight times with your pen on the felt.


4. Cut out the circles and use the fabric paint to make a volleyball design on each felt cutout.

5. Let those dry and start on your two bows.

6. Find out how big you want the bow loops to be and cut a piece of ribbon to the desired length. Glue down the two ends in the middle.


7. Add a little bit of glue in the center of the bow where the ends meet. Cut a small piece of ribbon just long enough to go around the bow, fold in the ends.

8. After all of the volleyballs and bows have dried place the first four volleyballs and bow out on your sock.

9. Use Aleene’s fabric glue to glue the volleyballs and bow on the sock. Cover the whole backside of the volleyball in glue and only the center of the bow. You can tack the bow and volleyballs down with thread if you like.

10. Use the dimensional fabric paint to create dashes moving diagonally between the volleyballs on the front of the sock.

11. Let it dry on the tube. Repeat for second sock.

12. Enjoy!

Wednesday, August 25, 2010

ILoveToCreate Teen Crafts: Flower Child Headband

ILoveToCreate Teen Crafts
Flower Child Headband
Copyright Margot Potter
"Mom crafted, teen approved."

I bought this exquisite Alexander Henry fabric to fashion curtains for my kitchen two years ago. My first attempt was a painful reminder of the old adage "Measure Twice, Cut Once." I adore vintage inspired fabrics and the colors in this are fantastic. I had some scraps left over and a sewn hem from the curtains. This idea popped into my head while I pondered some stretchy headbands I purchased a while back. I've shown how to create these fabric flowers before, in fact at the end of this post are several fabric flower projects I've created for ILoveToCreate.

This is so easy and fun and this headband can either be worn in a Flower Child style or as a traditional headband. Either way, this is the kind if accessory a stylish teen will adore.

Materials
Aleene's Fabric Fusion Glue
Large Floral Print Fabric
Coordinating craft felt
Stretchy headband
Thread

Tools
Sewing needle
Paintbrush

1. Select a flower to feature as the focal of the design. Cut it out, leaving fabric around it in a circle or oval shape.


2. Place fabric on felt and cut the felt just a little bit wider than the fabric.


3. Use a paintbrush and apply a thin layer of Aleene's Fabric Fusion glue on the back of the fabric. Press fabric on felt smoothing gently with your hands. Allow to dry.

4. I had a doubled up and sewn fabric section, but you can just double some fabric over, iron and create your fabric flower. I have a tutorial for this here and here.

5. Once felt has dried, cut felt edge off of flower to get a smooth edge.

6. Sew the fabric flower to the headband.

6. Sew the center of the felt backed flower and a black bead into the center of the fabric flower, the thread should go through to the headband so it's nice and securely attached.


Wednesday, August 18, 2010

ILoveToCreate Teen Crafts: Felty Good Pencil Toppers


ILoveToCreate Teen Crafts: Felty Good Pencil Toppers
Copyright Margot Potter

"Mom crafted, kid approved."


I can't believe it's almost back to school time around here! Avalon is excited to get her school supplies together. I love felt, and I always have a pile of felt scraps waiting to be used in projects. This pencil topper idea popped into my head and I'm really happy with how it turned out. Avalon squealed with delight when she saw these. You can, of course, make these uniquely yours using different colors, shapes and embellishments. Googly eyes are always fun! Aleene's Fast Grab Tacky Glue makes quick work of this project.

If you're knee deep in the dog days of summer and the choruses of "I'm bored" have driven you half mad, this is a great project to give your teens so they'll have something to do and something fun to take back to school..

Materials
Aleene's Fast Grab Tacky Glue
Various felt scraps in black, hot pink and white

Tools
Fabric scissors
Small disposable paint brush
Link
1. I cut two different length strips of felt for the base of the toppers. The black strip was 4.5"x1.5" and the black strip was 3 1/4"x 1 1/4" (remember these will be folded in half.) Cut out your shapes for the faces, arrange them on the felt strips to size and plan your designs.

2. Use a thin paintbrush to paint a strip of glue on the inside edges of the felt, fold over and allow to try. The center opening needs to be large enough to slide over a pencil top.


3. Use paintbrush to paint glue on the backside of your shapes and apply to felt. Fingers get sticky fast, so wash between embellishments to prevent fuzzy felt or glue splotches. Allow to dry.

Wednesday, August 11, 2010

ILoveToCreate Pink Splash 3-D Flower Bangle


ILovetoCreate Teen Crafts Pink Splash 3-D Flower Bangle
Copyright Margot Potter
“Mom crafted, kid approved.”

I designed a chain and bead necklace a couple of years ago featuring a similar hot pink die cut flower on it for a class proposal. At the time, this kind of look hadn’t hit mainstream fashion hard and I think it was just a skootch ahead of the curve. Flash forward to 2010 and dimensional floral accents are EVERYWHERE! I’ve re-imagined it attached to this pretty painted pink bangle design using fabric paints, fabric markers and Aleene’s Liquid Fusion glue. I think this is one of those perfect ‘Back-to-School’ accessories for the teen fashionista. It’s flirty and fun and girly and right in step with what’s happening in the fashion mags.

PLUS the flower spins around like a pinwheel, so it’s a kinetic design too! When those crystals get spinning, it’s really quite mesmerizing!

This requires using an electric drill, so a little assistance from mom or dad may be required. You could opt to do smaller flowers and have them circle the wrist, but I’m a big and bold kinda gal and so is Miss Avalon, my resident teen. Take this idea where you like, express your individuality! That’s what crafting and fashion is all about.

Materials
Grungeboard sheet swirls pattern
Tulip Soft Fabric Paint in azalea
Tulip Metallic Dimensional Fabric Paint in white
Tulip Metallic Dimensional Fabric Paint in metallic silver

DIY Bangles small wooden bangle
Inkadinkado lourish stamp
Aleene’s Liquid Fusion glue
Tulip Glam-It-Up™ crystals
Crystal bead for center
Pink or silver-plated head pin
Sizzix Bigz Flower Die

Tools
Tulip Glam-It-up™ tool
Sizzix Big Shot machine
Electric drill with 1/16” bit
Paintbrush
Foam brush or foam applicator
Flush cutters
Round nose pliers


1. Paint several layers of azalea paint on inside and outside of bangle. Allow to dry between layers.

2. Stamp flat oval areas with flourish stamp and white paint. Apply paint with a foam applicator or brush to surface of stamp. Allow to dry.

3. Mark center of one flat oval segment on bangle and drill.

4. Die cut flower out of Grungeboard using the Big Shot and the Bigz flower die.

5. Paint both sides of each layer of flower with azalea paint. Allow to dry.


6. Use foam applicator and flourish stamp to apply metallic silver paint to surface of flower layers. Allow to dry.

7. Use a thin paintbrush or your foam applicator to edge the flowers with the metallic paint. Allow to dry.

8. Glue flower layers together with Liquid Fusion. Allow glue to dry.

9. Use Tulip Glam-it-Up crystals and wand to apply crystals to edges of flower petals.

10. Thread head pin with flat side facing inside of bracelet through drilled hole, hole in center of flower and a crystal bead. Use round nose pliers to turn a loop and secure. (If the head pin head is too small, use a small button to secure it to the back of the bracelet.)

Wednesday, August 4, 2010

It's My One Year ILoveToCreate Teen Crafts Blogiversary!


Advertisement Copyright ILoveToCreate

As many of you know, this has been a crazy summer around Casa de Potter. Imagine my chagrin when I realized yesterday afternoon that I missed my one year Blogiversary with ILoveToCreate! It was July 16th last year when I posted my first teen craft project. Not to throw out a tired and overused cliche...okay I'm actually going to do that very thing...but time really flies!

Every week, my challenge is to come up with a project that is teen friendly and teen achievable. If it's too complicated or two 'grown up', it's not going to pass muster. Heck even saying pass muster isn't going to fly, teens have no clue what that means, and quite frankly neither do I. Let me search that...okay here! Trends are shifting constantly and I try my best to keep up with them. Silly Bandz were in and out of our schools here in literally one month. Who can keep up with that pace?! I try to combine a little retro sizzle with a modern twist, which is I suppose the trajectory of most of my work.

Luckily I have a fashion savvy teen here who advises me on the cool (or not too cool) factor of my ideas and contributes her own amazing projects to the mix when I need a helping hand. Ya gotta love that!

I've compiled a small smattering of my personal favorite projects here with links to the instructions for your edification, entertainment and enjoyment. If you go to this RSS feed, you can find all of my projects from the past year! These sometimes get lost in the shuffle of older posts and it's fun to take them out for another spin. I hope you enjoy and I look forward with breathless anticipation to sharing more Teen friendly craft ideas featuring the fabulous products for ILoveToCreate in the coming year.

Love
Madge

Madge's Top Eleven (I know, it's not ten, I like too many of them!) Favorite Teen Craft Projects from 2010...in no particular order!

CLICK ON IMAGES FOR INSTRUCTIONS!

Crafty Rock Star Necklace

Upcycled Denim Book Cover

As Time Goes By Necklace

La Tour d'Eiffel Tower Lamp

Mod Girl Chipboard Necklace

Pretty in Pink T-Shirt

Moulin Rouge Tiny Top Hat Headband

Snow Day Christmas Canvas

Halloween Hootenanny Invitation

Pretty in Peeps Necklace

Avalon's Awesome Sweet Dreams Throw Pillow