Showing posts with label free jewelry making project. Show all posts

Thursday, March 17, 2011

New Free Project for JTV's Jewel School: In the Pink Necklace

I am quite pleased with how this simple but striking design turned out. In fact, I wish I could keep it and wear it out! Alas it must live in my cubicle at JTV. Ah well, you can make one for yourself and wear it and I shall live vicariously through you.

There's a softer, more feminine feel to some of the looks on the runway for spring. I can picture this necklace with either of these outfits. It's so very Zelda Fitzgerald 2011.

Donna Karan Spring 2011

Nina Ricci Spring 2011

Feel pretty in pink with this rose quartz, bloodstone, copper and aged brass wire design. It's kicky, swingy, fresh and fabulous!

Follow this link for step by step instructions.

Cheers,
Madge

Tuesday, March 15, 2011

New Video on Demand for Jewel School!


Why look, can it be? Yes it is! Teeny tiny Madge has a new video project!

We are trying to march bravely forward at Casa de Potter. Here's my latest Video on Demand for JTV's Jewel School and it's just in time for Spring. I make a fun fringy wire necklace featuring Beadalon silver plated wire, smoky quartz and pretty striated cherry glass beads.

xoxo
Madge

Friday, March 11, 2011

And the winner is...plus a new free project for JTV's Jewel School!


And the winner of Crafty Chica's new novel is...Penny! Congratulations! Just email me at margot@margotpotter.com with your snail mail address and I'll forward that to the publisher!

Here's my latest project for Jewel School! For step by step instructions follow this link!

Cheers,
Madge

Friday, February 25, 2011

New Free Jewelry Making Project for Jewel School!


Here is this week's project for Jewel School, which I created many months ago on air. I like this one, it's simple but pretty and it's delightful on. You can get the instructions for this at the JTV blog. This is a great way to learn how to use the three channel bead board. It's one of those oft overlooked tools. You just build all three strands on both sides up to the same number and they will nestle into one another perfectly. No math required! It's terrific for Mad Men inspired triple strand graduated necklaces.

I'm off to the bead mines...tune in tomorrow when I reveal my project for the Bead Soup Blog Party!

Cheers,
Madge

Friday, February 18, 2011

Margot Potter for Jewel School: Lovey's Delight

Lovey's Delight Copyright Margot Potter for Jewel School

It's that time once again for a FAB free project for JTV's Jewel School! This is inspired by one of my icons, Lovey Howell from Gilligan's Island. Now don't get me wrong, I adored Ginger and MaryAnne, but Lovey was one of a kind. I'm also a huge fan of Lilly Pulitzer frocks, so you can see where this is all heading...

...yes, Madge is dreaming of her tropical retirement haven yet again.

Follow this link
to get instructions for this strung, wired and wrapped island friendly project.

Until next time, I'll be in a hammock in a ridiculously large sun hat and Lilly shift sipping tasty beverages from a pineapple served by a cabana boy.

Huzzah!

Cheers,
Madge

Sunday, February 6, 2011

Fire and Ice Necklace for JTV's Jewel School

Fire and Ice Necklace Copyright 2011 Margot Potter for Jewel School

To say that the past week has been a roller coaster ride is to put things mildly. The Misadventures of Madge sums it up! I'd share today, but I'm quite frankly too pooped to pen them. Here is this week's Video on Demand and Blog project for JTV's Jewel School Fire and Ice necklace. You can opt to make this more symmetrical by using all of one kind of dangle, I made two different longer dangles and alternated.

Follow this link for the Video How To and this link for the written instructions.

I'll be back in the blog saddle once my luggage finally arrives and I can unpack.

Seriously.

Love
Madge

Thursday, January 6, 2011

Let Them Eat Confetti Cake!


Ah...to have your cake and eat it too...and not gain any junk in thine trunk. Sign me up! This is my Confetti Cake design for Jewelry Television's Jewel School! These jump rings are created with Artistic Wire, a wire twister and the jump ring maker tool. You'll find the links for all of these FABULOUS products in the tutorial.

It's a fun explosion of color to perk up these gray winter days. Is it spring...yet?

Follow this link
to get directions!

Love
Madge


Thursday, December 30, 2010

Refreshing Jewelry for Jewel School!

Link
Get refreshed and ready for Spring with my Peppermint Patty Necklace, Bracelet and Earring Set for Jewelry Television's Jewel School! Click on this link to get the instructions!

Cheers,
Madge

Thursday, December 9, 2010

Princess Charming Bracelet for JTV's Jewel School!


I've got a brand new project on the JTV blog today! This is The Princess Charming bracelet which features my very first ArtClay silver heart charms! Follow this link to get the full instructions!

I feel like I've been neglecting you, please forgive. I've been so busy my head is spinning like Linda Blair in The Exorcist...minus the pea soup...and the scary make-up...okay never mind.

I am doing my best to carve out some time to catch you all up on what's happening in Madge's world. Soon, my little sniblets, soon!

Cheers,
Madge

Thursday, December 2, 2010

Pink Ribbon Necklace for Jewel School


My latest blog project for Jewelry Television's Jewel School is up on the JTV blog today! Just follow the link for step by step instructions. This is a project I created on last Sunday's live show with Kim Prentiss. Love this one! This is for the girly girl in all of us! Plus the wire tendrils remind me of the Breast Cancer Awareness ribbon, a happy design accident!

Make sure to click on the button above to see all of the projects in this month's Fave Crafts Finished on the 15th Blog Hop!

Love
Madge

Thursday, November 25, 2010

Jungle Boogie Bracelet and My Official Debut on Jewel School!


Follow this link to the JTV Blog to get the instructions for my Jungle Boogie Bracelet I showed on air last Sunday. Tune in to Jewelry Television on air or on the web today from 9-noon EST live for my OFFICIAL debut on Jewel School with the lovely Miss Kim Prentiss.

Happy Thanksgiving!

xoxo
Madge

Thursday, November 11, 2010

Heidi Goes Glam and Madge's Pre-Debut Debut on Jewel School

Heidi Goes Glam Mixed Media Necklace Copyright 2010 Margot Potter for Jewelry Television

Here's a sneak peek of a new project I created this week for Jewelry Television. I called this Heidi Goes Glam. The hand painted mother of pearl beads are to die for cute, don't you just love them?! Check their blog for step by step instructions today AND tune in from 9am to 12pm EST for my pre-debut debut on Jewel School! If you can't watch on TV they live stream on their website.

xoxo,
Madge

Thursday, September 2, 2010

Fall Stringing Issue Projects!

Fashionista Copyright 2009 Margot Potter

I have been meaning to share here and with all of the balls I've been juggling, I'm afraid this one got left out of the circus. I'm so excited to have a necklace in the Fall issue of Stringing Magazine. The focal pendant is from Auntie's Beads, isn't it fab?! I'm really happy with how this design turned out.

Hootenanny Copyright 2009 Margot Potter

There's a second necklace I created which is featured as a web project and it's perfect for Fall and of course, for Halloween! This is available as a free download on Beading Daily! I'm a fan of vintage plastic beads and these owls from The Beadin' Path make me so happy I can hardly stand it!

You can follow this link for instructions for the Hootenanny Necklace and find the instructions for Fashionista in the issue that is on newsstands right now!

xoxo
Madge

Thursday, August 26, 2010

Free Jewelry Making Project #4 from Bead Chic

Steel City Earrings from Bead Chic by Margot Potter ALL RIGHTS RESERVED

I can't believe this is my final free project from Bead Chic! Where does the time go? This one is a little more complex and a little bit funky. You can refine it or make it funkier as you choose. I love the primitive look of annealed iron wire, you can buy it at hardware stores and some places online. It's a little rusty, so you need to clean it before you wear it!

I enjoy bending and shaping wire and the nice thing about a very stiff wire like iron is that it maintains its shape without too much need for work hardening, yet it takes to being hammered beautifully. These earrings are made from three artfully bent wire segments that swing and sway separately from one another. I added freshwater pearls suspended in some organic wire wrapping with a thin gauge of silver plated wire. These, to me, have a Sundance Catalog appeal.

In fact...when I pitched this book here is how I summed it up:

Banana Republic and Sundance Catalog have a latte at Starbucks.

Chic, modern, upscale with just a little edge!

The variation for this project is created by the lovely Ms. Barbe Saint-John. You'll have to buy the book to get the step by step photos and to see Barbe's gorgeous earrings. You can also leave a comment here to win the last free signed copy of the book!

xoxo
Madge

Bead Chic
Steel City Earrings
Chapter One
Scale


Materials
2 8mm faceted cream freshwater pearls
24 gauge silver plated wire
20 gauge annealed iron wire
Gun metal French clips

Tools
Chasing hammer
Mini anvil
Large round dowel (I used a large marker)
Small dowel (I used a metal end of a rat tail comb)
Memory wire shears
Round nose pliers
Chain nose pliers
Wire cutters

Tip: Play with the wire to get a feel for it, different wires have different levels of malleability. These do not have to be perfect...so don’t sweat it if they aren’t!

1. Cut a 3” segment of steel wire using your memory wire shears.

2. Bend the center around a large marker.

3. Hammer the ‘u’ section flat using the flat end of your chasing hammer.

4. Cut a 1 2/8” section of wire and use the tip of your round nose pliers to create a very small loop in both ends.

5. Cut a 1 ¼” section of wire and bend it over the metal end of a rat tail comb.

6. Use your round nose pliers to create a loop in both wire ends.

7. Wrap a 24 gauge wire tightly to one side of the top section of your ‘u’ shaped component as in photo moving the wire down the core.

8. Wrap wire around core in a free form manner.

9. Thread a pearl on end of wire.

10. Thread wire around opposite side tightly and wrap remaining wire moving up the core in a freeform manner as before.

11. Cut off excess wire and use chain nose pliers to tuck your wire tails in.

12. Connect your segments together as follows: Attach the ‘v’ shaped component to the loops on the end of your bar component. Attach the ‘u’ shaped component to the bar. The loops should all face backwards so the components can swing freely when worn.

13. Attach your ear wires to the top of each ‘v’ section.

Thursday, August 19, 2010

Free Jewelry Making Project #3 from Bead Chic by Margot Potter


Did you know how easy it is to create your own findings? Once you master that skill, you'll find it difficult to buy them ready made! This project from my new book Bead Chic shows you how to create some longer bent and curved ear wires. You can opt to use base metal instead of sterling, but definitely use a 20 gauge wire made from stainless or another more sturdy metal and make sure you sand or use a wire rounder on the ends. I used a rat tail comb to create the sharp bend...I'm of the mind that you use what you have at hand!

I called this design 'Effortless Elegance' because it's just a few lovely beads and an artfully bent wire. This is from the chapter on Pattern and the variation is a little more complex with some hammering of the front part of the ear wire and some simple wire wrapping on a QuickLinks component. You could wrap beads on the front part of the ear wire...or add coiled wire...or add a bead or two...see how this keeps shifting if you make small changes? That's what this book is all about! You'll need to buy the book to get the step by step photos.

If you leave a comment here, I will select one of you to win a signed copy of the new book and a bonus swag sample. I'll announce the winner next Saturday August 28th.

Good luck!

Cheers,
Madge

Effortless Elegance Earrings Copyright Margot Potter 2009

Effortless Elegance Earrings
Bead Chic
Copyright Margot Potter ALL RIGHTS RESERVED

Materials
2 12x17m black onyx polished tear drop beads
6 3mm red coral beads
6 24 gauge sterling head pins
2 ball tip sterling head pins
20 gauge sterling wire

Tools
Round nose pliers
Chain nose pliers
Thin metal dowel (I used metal end of a rattail comb)

1. Cut off two 3” segments of wire.

2. Bend wire over a thin dowel to create a crease or point, this should be not quite in the center of the wire and in the same spot on both wires.

3. Gently round both wire tails into a matching curve.

4. Sand ends of wire.

5. Bend a loop in one end of wire using round nose pliers.

6. Create wrapped dangles using ball tip head pins and onyx beads. Repeat for coral beads using regular head pins.

7. Attach beads to loop at end of ear wire onyx first followed by three coral beads. Use chain nose pliers to open and close loop.

Thursday, August 12, 2010

Free Jewelry Project #2 from Bead Chic by Margot Potter


It's Week #2 of the four week bonus Free Projects from my new book Bead Chic! Here's the one from the Make Jewellery feature I showed you last week. You'll need to get the book for the step by step photos.

Enjoy!

Leave a comment for a chance to win a free signed copy of the book!

If you left a comment last week, stop in on Saturday to see if you won, I'll announce this week's winner next Saturday!

Cheers,
Madge

(Image copyright Margot Potter 2009)

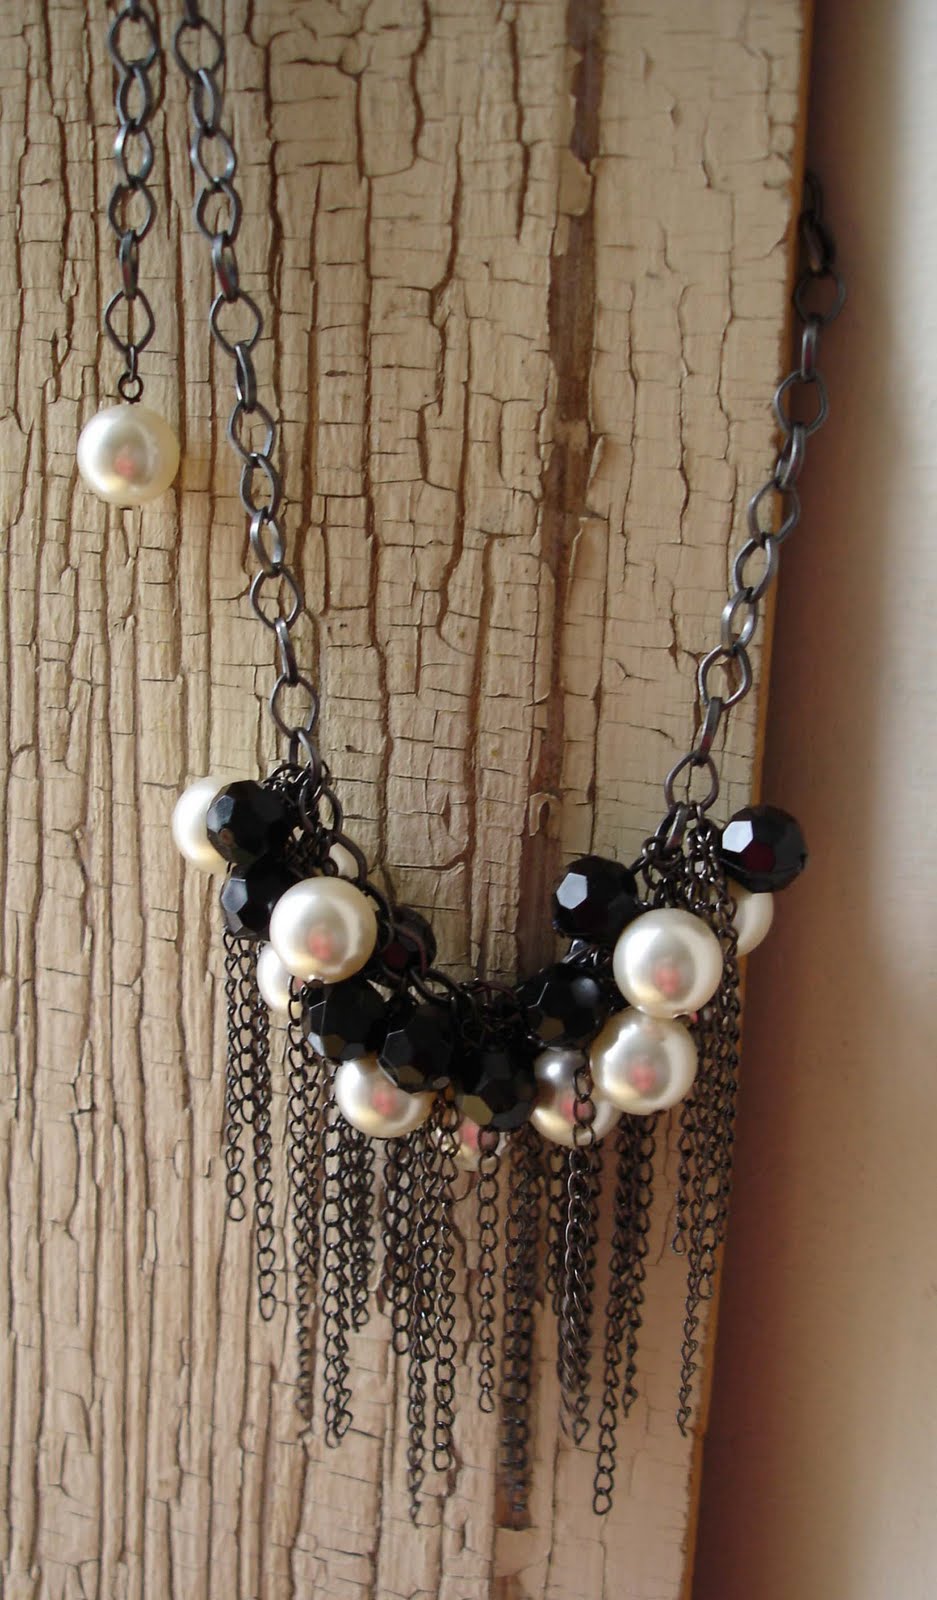
Chaos in Pearls Necklace
Bead Chic
Chapter One: Scale
Copyright Margot Potter and North Light Books
ALL RIGHTS RESERVED

Crystal pearls, faceted plastic rounds and gun metal chains are clustered in a chaotic mass at the front of this daring, delightful and decidedly different necklace design. The less you map this one out, the better. You can opt to vary the chain lengths even more dramatically to give this an ‘haute couture’ design flavor.

Materials
13 8mm black plastic faceted rounds
14 12mm SWAROVSKI ELEMENTS cream pearls
39 1.5-3” lengths small gun metal curb chain
18.5” section gun metal oval rolo chain
27 gun metal head pins
1 large silver plated swivel lobster clasp
15 4mm gun metal jump rings

Tools
Round nose pliers
2 pairs chain nose pliers
Wire cutters

1. Cut 39 1.5-3” sections of small gun metal chain.

2. Create looped dangles for every pearl and faceted round.

3. Cut an 18.5” section of rolo chain. Attach a pearl to one end using a jump ring.

4. Attach the lobster clasp to the other end using a jump ring.

5. Starting on the 32nd link in your chain, attach a pearl, a faceted round and three varied lengths of small chain with a jump ring to the link.

6. Move down every link and continue attaching a pearl, a round and three varied lengths of chain on a jump ring. There are 13 pearl, round and chain combos.

Thursday, August 5, 2010

Free Jewelry Making Project from Bead Chic Week #1

Click on image to view close up. Copyright Margot Potter for North Light Books ALL RIGHTS RESERVED

Leave a comment and I'll select TWO people to get signed copies of the book on next Thursday.

This is the first of four free projects I'll be sharing from my new book Bead Chic. For photo step by steps, you'll need to get a copy of the book. It's a really great book, trust me. There are 15 gorgeous variation projects from 13 well known designers in the craft and jewelry making industry and a lot of variety in terms of style and techniques. I give you a bit of everything, including stringing, exposed wire weaving, wire wrapping, metal stamping and hammering, making your own findings...but the focus of the book is on design. You'll explore how you take a design that inspires your creativity and make it your own through small changes in color, scale, pattern, texture, focal elements and foundations.

This is the project we did at my Beadalon make it and take its at CHA and it's very easy and satisfying. I don't know why, but to me, taking some wire and bending, coiling and hammering it into a pair of earrings never fails to blow my mind. It's just a copper wire, until you forge it into something fabulous. Like every project in the book, this is all about making it your own, so think about what you might change to make this project suit your design style.

Bead Chic
Curlicue Earrings
Chapter Three-Texture
Copyright Margot Potter

When coiling wire around a jump ring maker tool I pulled the coil off and gently tugged it apart and got these great little curlicues! They add just the right touch of whimsy to simple hammered copper earrings. You can take this idea so many places...so what are you waiting for?!

Materials
20 gauge copper Artistic Wire

Tools
Jump ring maker tool with ¼” dowel
Round nose pliers
Chain nose pliers
Wire cutters
Chasing hammer
Mini anvil or steel bench block
Bench block pad

(Tools and materials courtesy Beadalon)

1. Cut off a 3” segment of wire. Round over a large dowel or use fingers to create a hoop shape.

2. Create a small loop at one end of the wire.

3. Bend the other end up at a 90 degree angle.

4. Use rounded end of hammer on a mini anvil to add texture to both sides of your ear wires.

5. Adjust shape after hammering.

6. Wrap wire around a jump ring maker with a ¼” dowel.

7. Remove coil and gently pull apart.

8. Move down every four coils and cut off coiled segments.

9. Use round nose pliers to make a small loop in one end and a larger loop in the opposite end. Make fourteen coils.

10. Thread larger end of 7 looped wires on earring. (Be sure coils are all facing the same direction.) Repeat for second earring.

Thursday, April 16, 2009

Free Jewelry Making Project!


This project from my new book Beyond the Bead is available as a free download at the MyCraftivity site until April 24th! Learn how to turn poly clay into faux metal with a fun and simple technique. I still need to make a necklace for this set...hmmm...better get on that!

I've got a lot of stuff going on behind the scenes here and hopefully soon some of it will be solidified for announcement status. At least it's keeping me out of trouble! Tom Petty was so right when he said the waiting is the hardest part!

Until next time...craft on with your bad selves.

xoxo
Madge

Thursday, March 19, 2009

Final Free Mixed Media Jewelry Project from Beyond the Bead


Nice and Naughty Shrink Art Charms Copyright 2009 Beyond the Bead by Margot Potter
Nice and Naughty Shrink Art Charms Variation Copyright 2009 Beyond the Bead by Margot Potter
(Click on images to view close up!)

It's time for the final free project from my fabulous new mixed media techniques for the beader book...Beyond the Bead! Insert cries of unfettered glee and joyous abandon here.

This 'charming' project has a tale to tell. Originally these little flappers were a little more...shall we say...naughty. I was asked to consider covering them up just a skootch more and I agreed. It was never my intention to offend, I just have an affection for vintage pin up art. But only if it's naughty...and nice. It looks as if the Dover book I used is no longer in print, so I've provided a link to a fashion illustration title from the same period with less risque images. I've also included some variations I made using colored pencils and vintage Vogue pattern images from the 1940s. This is a pretty straightforward idea, you pick bold pen and ink images and you trace them on the shrink plastic. I'm all about make it easy and make it fun...this is a great project to do with kids (using kid appropriate images...of course!)

So without further drivel...here's your free project! Leave a comment and I'll randomly select a winner to be announced on April 1st. No fooling, tee hee. I'll be sending you a signed copy of the book, a jaunty Beyond the Bead promo button and a stash of CRYSTALLIZED-Swarovski Elements sparklies for your collection! Good luck! Oh and if you're on Facebook, would you consider joining my Fan Page? I'll announce upcoming events and airings on QVC there, share project debuts and links to what's new in Madge's world. Pretty please?


Nice and Naughty Shrink Art Charms
Copyright 2009 Margot Potter
Beyond the Bead for North Light Books

Are you a naughty girl? Do you love to dance on the edge of decency? Do you ‘rouge your knees and roll your stockings down’? Well, my little flapper girl, these nifty little shrink art charms are certain to suit your style. Vo dee oh doh!

*Any clean and simple black and white inked illustrations will work here. The bigger the better so you can really get the detail in before it shrinks! It’s important to use a very, very fine tipped market so you can really get the lines clean or the finished result could be lacking in definition. You can add more or less color depending on your mood.

Supplies
Dover Spot Illustrations Book
Rough and Ready shrink plastic
Ranger Adirondack pen red pepper
Ranger Archival Ink black

Micron 005 fine tipped black marker
4mm gun metal jump rings
Krylon silver leafing pen
Sheet of brown kraft paper cut to fit oven tray

Tools
Hole punch
Craft dedicated Toaster oven
Metal spatula
2 pairs chain nose pliers

1. Select images from book. Remember that they shrink a lot, so pick large detailed images for best results.
2. Trace images on rough side of plastic using a fine tipped marker.
3. Accent images with red marker.
4. Cut out images with sharp scissors making interesting shapes.
5. Create hole in top of image with hole punch.
6. Place images in preheated toaster oven on top of precut brown paper bag liner on oven tray.
7. Allow to shrink, use spatula to flatten any still curled images before cooling.
8. Remove from oven and allow to cool.
9. Use metal leaf pen to edge images. Allow to dry.
10. Attach jump rings to charms.

Supplies
Rough and Ready Shrink Art Plastic Shrinky Dinks, Spot Illustrations Dover Books, Adirondack pen and Archival Ink Ranger, Micron pen Kuretake, Silver leafing pen Krylon, gun metal jump rings Rings n’ Things.

Friday, March 6, 2009

Top Secret


Illustration Copyright Enoch Bolles

I'm plugging away at samples for a new book query.

Unfortunately as I'm working on this query I can't show you a thing. Not a thing. Can't show you a thing until the book is sold and published. That's the way of it. I can't give it all away. A gal has to eat ya know!

There's also no guarantee this idea will sell. I think it's a unique enough concept that it's got legs, but it's a tough market right now. There are a LOT of jewelry making books on the shelves. Publishers aren't taking risks because they can't afford to. Even when the economy is booming, craft titles aren't exactly huge money makers. It's just another way to get your name out there and build your brand.

I'm also putting the kits together
for my AC Moore class in Moorestown, NJ tomorrow. This is the grand re-opening of the first AC Moore and the kick off for Craft Month, so it's a pretty big deal. If you live in the area, please consider stopping by for the make it take its or taking the class. I'd love to meet you!

Until tomorrow...craft on with your bad selves.

xoxo
Madge