Showing posts with label mixed media. Show all posts

Tuesday, July 20, 2010

Designerpalooza Week One for Kathy Peterson and The Cedar Store!


My friend Kathy Peterson is a whirlwind. She's a TV host, designer, writer, lifestyle expert and all around creative guru. She's got a fabulous new line of Adirondack Chairs for The Cedar Store and recently she invited me and four other designers to participate in a designer round robin. I was so flattered and excited to be part of such an amazing group of creative women. Each of us got our very own Adirondack chair to decorate and every Tuesday for the next five weeks we'll each post a sneak peek and a link to the featured designer's work of art.

Pat Sloan is the first designer in our group and I was intrigued by the painted pattern on her sneak peek. She's a reknowned quilter and artist and I do believe, if I'm not mistaken, I detect a quilt pattern, perhaps even a wedding circle motif, here. Here is Pat's bio below and if you click on the picture above you'll be magically transported to her blog and get the full view! Thanks to

Pat Sloan has been creating since she was a child. From the first shoebox dioramas to sketches for a fabric line, there has always been creative energy flowing. When she tried her hand at quilting in 1985, she never looked back. Now, owner and founder of the quilting design and publishing company Pat Sloan & Co., she has published over 20 books, more than 100 patterns, nearly 10 fabric lines, and has had her work featured in major quilt magazines.

Pat first began sharing her knowledge through her publications, workshops, and lectures, but as expanded her reach through social media. She has built quilting yahoo groups, forums, facebook communities, and even the group “Quilters in Second Life” for quilting enthusiasts using the popular virtual world, Second Life. Also interested in beading, painting, and paper crafting, Pat’s overall passion has always been to help others harness their creative energy.

Tuesday, March 23, 2010

ILoveToCreate Teen Crafts Trashionista Mixed Media Purse


ILoveToCreate Teen Crafts
Trashionista Mixed Media Purse
Margot Potter

"Mom crafted, kid approved."
Copyright Margot Potter All Rights Reserved

I have an ever bursting at the seams pile of fashion mags that sit by my bed and on the kitchen table. I peruse them at night before I go to sleep and while I’m noshing to trend spot. The problem is that they start to take over my house if I’m not careful! What I don’t recycle, I love to use to make accessories. The words and images on this purse are all made of recycled paper. This is all about layers of paper, inks and paints and every purse will turn out differently. I love that! 

Teaching our teens about the many ways they can recraft, reuse and repurpose is crucial. Plus this project will be a lot of fun for them to personalize. You can do this with old cigar boxes and get hardware and a handle to retrofit. Avalon loved this one and I’m hoping we can whip up some more soon together.


Materials

Wooden purse blank
Aleene’s Traci Bautista Collage Pauge Matte
Crafty Chica Little Chica Paints Red
Fashion Graffiti Paint Cannon Fabric Paint White
Fashion Graffiti Big Phat Fabric Marker Black
Fashion Magazines
Vintage book pages or newspaper
Inkadinkado Animal Print Clear Stamps
Fiskars Clear Stamp Block
Sizzix Big Shot Flower Die

Tools

Sizzix Big Shot
Mini-screwdriver
Paintbrush
Foam Brush
Old toothbrush
Scissors

1. Remove hardware from purse. Sand, clean and coat purse with a layer of racy red paint inside and out. Allow to dry.


2. Use Big Shot and die to cut three vintage book page or newspaper flowers.


3. Select words and images.  Decoupage flowers and cut and torn magazine words and images to the purse front using Collage Pauge matte and a foam brush. Allow to dry. If bubbles form under the images, wet your finger with water and work them out from center. Don’t fret about bubbles, they’ll go away once the medium is dry.  (I had to remove and replace a word at the top of this purse...which you can do while everything is still wet.) 

4. Use the Big Phat marker to put a layer of ink on your stamps and randomly stamp the leopard and tiger prints around edge of purse. Allow ink to dry.

5. Use marker to make angled stripes on thinner edge of purse. Allow ink to dry.


6. Dip an old toothbrush into the white paint and flick it across purse front. Repeat using red paint. Allow to dry.

7. Reassemble purse.

Thursday, February 11, 2010

Free Mixed Media Jewelry Project: Sweetheart Foam Necklace


I bought a huge bin of heart shaped foam stickers recently and I immediately thought of this idea.  I figured if I didn't want to stick them to something, I could easily stick glitter to them.  Plus I'd avoid the dry time associated with glue.  Thankfully, it worked out for me.  I recommend using ultra fine glitter.  You could also stick patterened paper on them and seal with decoupage medium...and well there are a zillion other things we might do with them with a little crafty ingenuity. It's easy to remove the sticky stuff with a little soap and water if you want to just feature the foam.  I honestly think these foam stickers are usually pretty cheesy, but I've managed to make two projects with them this week that I really do like.  They're lightweight and soft and easy to stamp and punch...so I'm thinking maybe I'm on to something here.

This was my snowy day in Amish country project and it kept me from staring out my window with my mouth agape as the snow piled up at a rapid and disturbing pace.  Yes, it was that snowy.  So with love, from me to you gentle reader, here is the Sweetheart Necklace.

xoxo,
Madge

Sweetheart Necklace
Free Mixed Media Jewelry Project
All Rights Reserved Copyright Margot Potter

Materials
Foam Heart Stickers (I got mine at WalMart) You'll need 3 small white and 3 small red hearts and 2 red and 2 white scalloped open center hearts.  You can adapt this idea to suit your stickers.
Art Institute Art Glitter Caribbean Mix
20 gauge Artistic Wire
Elongated cable chain
5 10mm sp jump rings
6 6mm sp jump rings
Scrap paper to catch glitter
Micron Pen

Tools
Crop-A-Dile
2 pairs chain nose pliers
Round nose pliers
Chasing hammer
Mini anvil


1.  Pour a small pile of red glitter on your sheet of paper.  Dip the sticker side of your red hearts in the glitter, covering the entire surface.  Tap off excess.  Fold paper and pour glitter back into jar.  Repeat using ab white glitter and white hearts.

2.  Mark hole placement with a Micron Pen.

3.  Use Crop-A-Dile to punch small holes in marked spots.


4.  Connect large hearts with 10mm jump rings.  Attach small hearts with 6mm jump rings.  Attach earring hearts with 10mm jump rings.

5.  Create a wrapped and hammered hook using 20 gauge Artistic Wire, a chasing hammer and a mini anvil or steel block.  I have step by step instructions for this in most of my books.

6.  Attach hook to chain with a 10mm jump ring (my necklace is a 16" finished length and you may adjust to suit your tastes.)

7.  Attach open end of chain to left side of the pendant section of your necklace with a 10mm jump ring.

8.  Make a matching pair of earrings as in the photo.  Connect them with 10mm jump rings and attach a French wire earring finding to the top jump ring in each small heart using a 6mm jump ring.  If you need to turn the loop on the ear wire so the earrings hang forward, use your round nose pliers.

DESIGN NOTE:
After wearing this I wasn't happy with the way the hearts in the center of the scalloped frames were hanging, so I marked and punched more holes and connected the bottom centers to the bottom center of the frames.  Much, much better!  See picture below...
Designer Note: Chain, wire and findings courtesy of Beadalon.  All other elements were purchased at retail.

Wednesday, January 13, 2010

More Fun with Dimensional Fabric Paint!

I have this thing where I can't make a necklace without making earrings that match.  Okay well sometimes I do, but mostly I feel incomplete if it's not a set.  If I'm feeling extra cheeky I'll make a bracelet.  Do you have that same thing...or is it just me?


Yesterday after I posted my Mod Girl project for iLoveToCreate I simply had to make some coordinating chipboard earrings.  Avalon came home from school and found the foam core board upon which I painted the necklace components and she loved the bits of paint left over.  She asked if she could have it to make a painting and of course I said yes.  She added some of the Tulip fabric sprays in neon colors and layer after layer of dimensional fabric paint and came up with this very cool Pollockesque painting.  I made earrings while she made her masterpiece.  


Then I decided to squish the paper on which I'd made the earrings after adding a little more paint and ended up with a cool Impressionist inspired background.  I punched out little circles with my Fiskars squeeze punches and I'll find a home for these in a design. 


You never know where inspiration will strike. What I love about kids is they don't have filters and they see things adults miss. Don't toss away those scrap papers...maybe there's something there!  


xoxo,
Madge

Tuesday, December 8, 2009

Victorian Snow Day Mixed Media Canvas by Margot Potter for iLoveToCreate Teen


(Click on images to view close up)

Victorian Snow Day Mixed Media Canvas
Recycled Teen Craft Idea
Margot Potter for iLoveToCreate Teen
Copyright 2009
'Mom crafted, kid approved!'


I love little canvases, not just for paintings but also for setting off a variety of mixed media art projects. This is one of those “use what you’ve got” ideas. I happen to have a generous stash of old bits and baubles around my studio, but this idea works equally as well with last year’s Christmas card and the trims and broken jewelry bits from your own drawers (or if you’re a teen, ask your mom for some stuff to use here.) If you like this vintage inspired look, you can find Victorian era postcards and old jewelry on eBay and if you don’t care about the condition (which I mostly don’t because I’m using them for my artwork) they can come very affordably. Dover Books has a huge selection of permission free images from this time period. If vintage isn’t your thing, adapt the idea to a more modern style.

I rummaged around my studio drawers for things to adhere to the edges. I had some faded old lace from an Estate Sale, broken rhinestone jewelry, old buttons and a vintage stash of Rick Rack trim. I love this silver, white and red color palette, but you can switch it up however you like. The idea in everything I do is to inspire you to be creative and make it your own. Inspiring you to ‘create without filters™’ is what I’m all about. What a fun project for Mom and teen to work on together and these make absolutely lovely gifts.

Materials
Oval 8"x10" mini canvas
Printed permission free image scanned and sized to fit center of frame (mine was 4.5"x7")
Trim (I used red rick rack)
Accent items (buttons, old jewelry, ribbon...whatever you like)
Flourish stamp
Ranger paint dabber silver
Fabric fusion
Liquid fusion
Tulip dimensional paint silver
Tulip dimensional paint multi glitter
Tulip fashion ultra fine multi glitter

Tools
Scissors
Paper cutter
Sea sponge


1. Select an image for your canvas. If you need to scan and size it, do so, but remember that you can’t copy images that are protected by copyright like thinks in books or magazines. Copyright protection in the US is 100 years, so this Victorian era postcard image is officially permission free. Try Dover books for a great selection of permission free images. The image needs to fit the center of the canvas, so size accordingly.

2. Use a sea sponge to apply a layer of silver paint to the edges of the canvas leaving area where picture will go unpainted. Add a layer of glitter paint to canvas. Sprinkle a thin layer of glitter on top of paints and shake off excess. Allow to dry.

3. Dab the silver paint dabber on the flourish stamp to stamp around edges of frame.

4. Place Fabric fusion glue in four corners of your printed image and adhere carefully to canvas. Run a thin layer of Fabric fusion along the edges of your picture and add fabric trim. Cut off edges as you work to frame the picture.

5. Create a fabric bow and use Liquid Fusion to adhere a decorative element to it. Allow to dry. Glue bow to bottom right edge of frame.

6. Glue buttons to bottom left and top right edge of frame.

7. Glue a recycled jewelry accent to the top left edge of frame.

8. Allow to dry overnight.


Tuesday, November 24, 2009

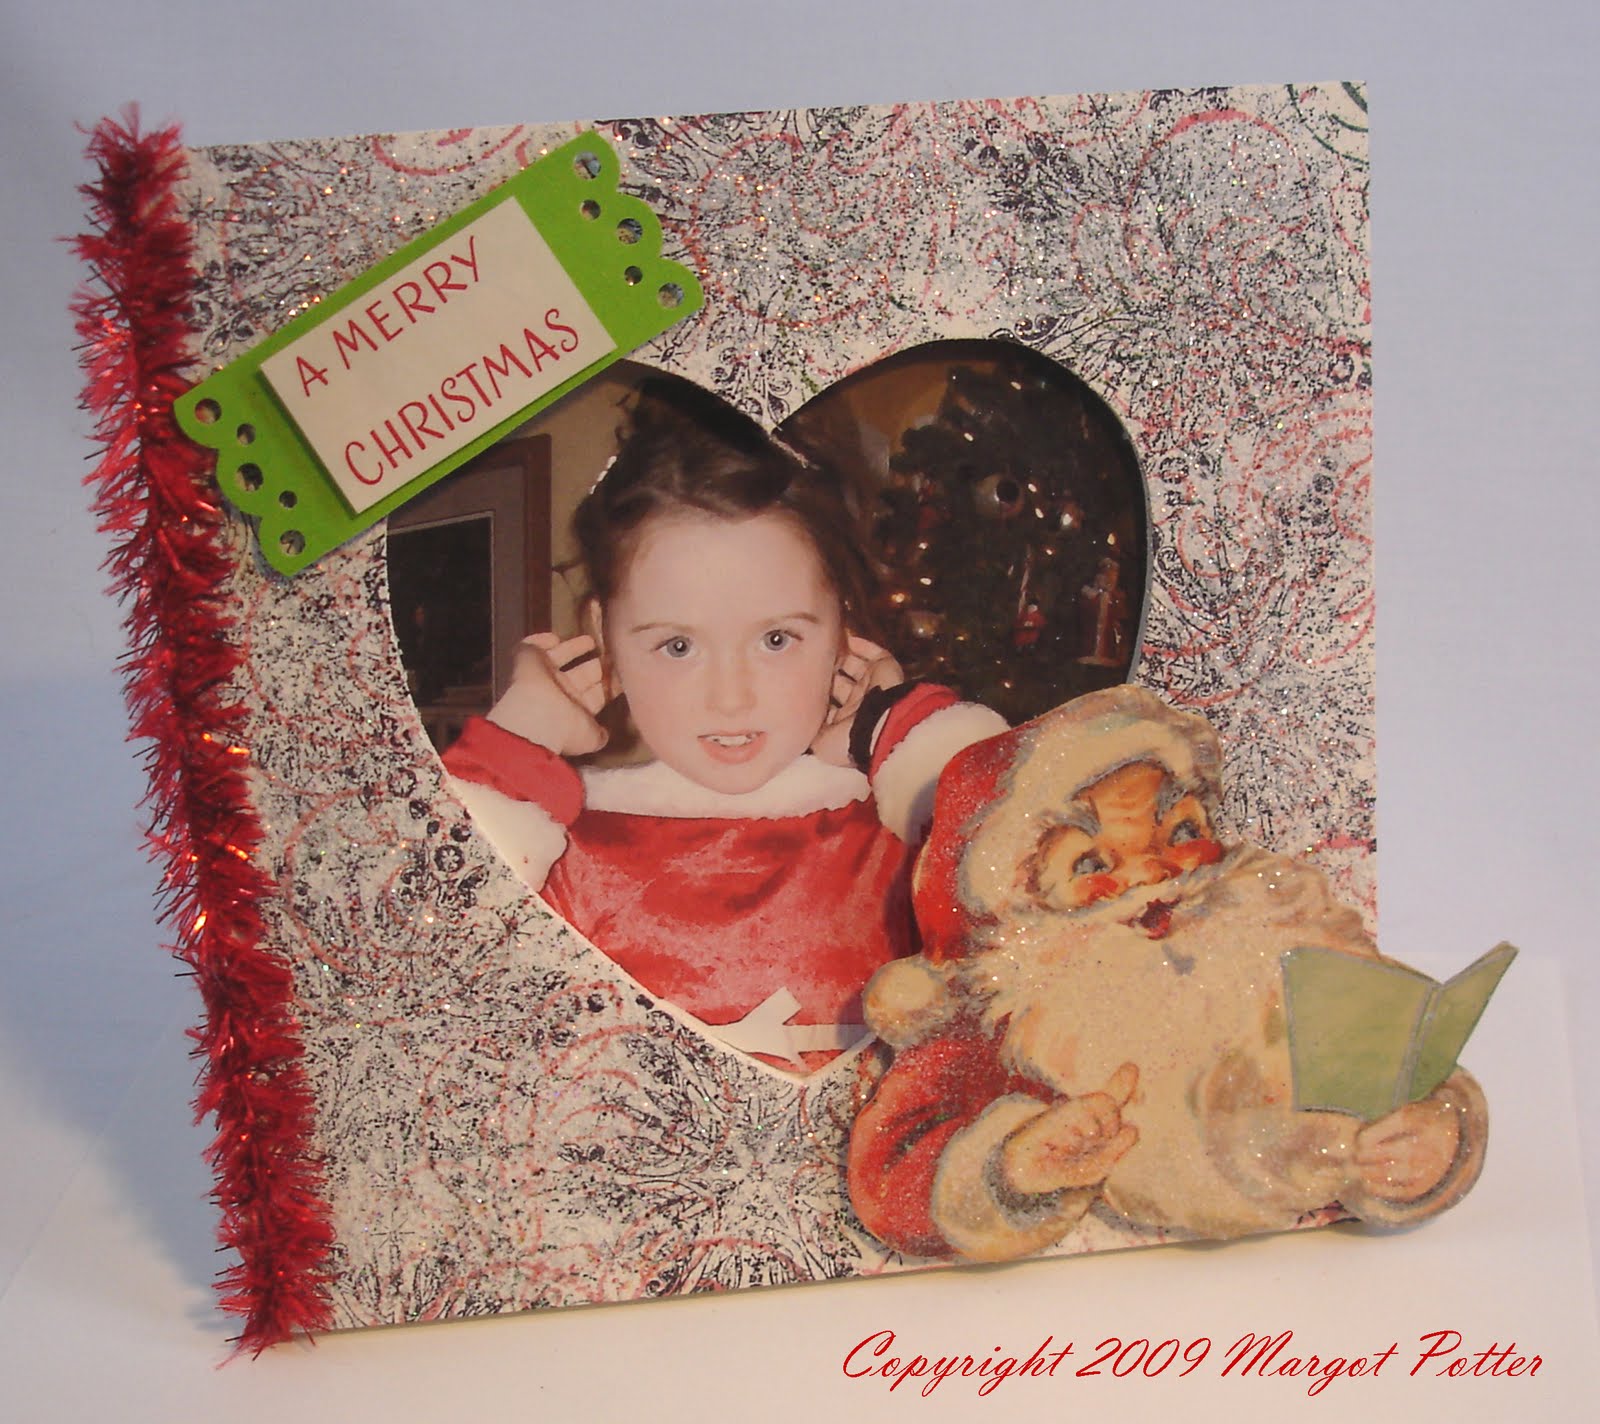
iLoveToCreate Teen Retro Christmas Photo Frame


iLoveToCreate Teen Retro Christmas Photo Frame
Grandma’s Gift Idea
Copyright Margot Potter
“Mom crafted, kid approved.”


I’ve been collecting vintage goodies for over 26 years now. Much of my collections have been pared down due to the lack of storage here at our little school house and my many moves. The one collection I can keep expanding and justify for my work is my ephemera. That’s a fancy word for vintage paper. I just scored a little stash of 1950s era Christmas cards and I knew I had to use them for an iLoveToCreate project. (Truth be told these aren’t much older than me...which of course makes me vintage but I’m in denial.)

This frame cost a buck and the rest of the supplies are very affordable. You can find lots of vintage cards on Etsy or eBay. They’re super cheap and super fun for your artwork. My daughter finally fessed up to knowing the 411 on the jolly old elf, but we’ve known for a while she had it figured out. I just wanted to keep that Christmas magic alive as long as possible. This is a great holiday pic of Avalon from a few years back and I thought it could make a terrific gift for one of her Grandmothers or for us to use in our regular holiday décor. Teens can have a lot of fun with this project, and they get to enjoy a little bit of Christmas past if you use vintage cards. (Note: Don’t scan and copy the images from the cards and use them again, these images are under copyright. You can cut them out and use the physical card, but you can not reproduce the images. US copyright protection lasts 100 years.)

Materials
One wooden frame with heart shaped opening
Wired tinsel
Image from vintage greeting card
Text from vintage greeting card
Green cardstock
Aleene’s Fast Grab Tacky Glue
Aleene’s Liquid Fusion
Crafty Chica Little Paints White
Tulip Fashion Glitter White Pearl
Archival ink jet black
Adirondack ink red pepper
EK Success clear snowflake stamp
Inkadinkado flourish stamp
Dimensional foam stickers
EK Success metallic writer pen in silver

Tools
Martha Stewart lace edge punch
Scissors
Paper cutter
Tracing pen or pencil
Paint brush


1. Paint frame white. Sprinkle a fine layer of glitter over paint. Shake off excess. Allow to dry.

2. Randomly stamp snowflake over frame (try not to overlap) using archival ink in jet black.

3. Randomly stamp flourish over frame (try not to overlap) using Adirondack ink in red pepper.

4. Select image you like for bottom right corner of frame and cut it out. Use writer pen in silver to accent parts of image.

5. Spread a thin layer of glue on parts of image you’d like to coat with clear glitter. Sprinkle glitter on image and shake off excess. Allow to dry.

6. Cut out words you want to use. Using cardstock make a frame for the words. Use the scallop edge punch to decorate the edges of your frame. Adhere words to paper frame using two dimensional foam stickers.

7. Run a thick bead of Liquid Fusion along edge of frame. Place tinsel on edge, cut off excess. You can put some small glue bottles on the tinsel to secure it while it dries.

8. Adhere Santa to bottom right of frame using dimensional foam dots with a layer of Liquid Fusion under them.

9. Adhere text to top left of frame using dimensional foam dots with a layer of Liquid Fusion under them. Allow glue to dry overnight on images, text and tinsel.

10. Select and size a picture to fit the frame. Keep the cardboard insert to trace and cut image to fit inside of frame and to secure image inside of frame.

Wednesday, September 9, 2009

Yes, I have no free project.


Today I'm not going to post a free project or a picture of a project or anything even remotely related to...a project.

Did I mention I'm not posting a project today?


Just so we're clear, I will reiterate. There will be no free project in today's post.

I've got so much to do in the next two weeks my brain hurts. Even so, there are two project ideas that aren't on the docket that seem intent on nagging me until I explore them. What is that? Is that just some sort of subconscious passive-aggressive procrastination or...am I really the Craft Whisperer? It started with a small bottle from my backyard vintage bottle collection. Suddenly and without warning this bottle started suggesting I turn it into a mixed media necklace. I tried to ignore it, but alas my efforts were in vain. So it's sitting on my desk now and I've promised to address it when I get caught up, but it's an insistent little vintage bottle. I also have this idea for inked and altered acrylic charms that has been running through my brain in cleats for three weeks now. Why can't I just sprout two more arms and get on with it?

Why indeed.

I'm trying to set up and fine tune some future appearances and engagements, but every one of them requires me to make samples and map out plans and it's becoming increasingly apparent that I'm not Super Crafter and I can only do so many things in any given day before I start to hyperventilate. Why can't I have minions to do my bidding? Is that asking so much?!


I've got boxes filled with samples from companies waiting for me to test them out and present them with projects and ideas. I've got a big deadline from a manufacturer for about 15 innovative designs looming and an overdue project for a book that's totally out of my comfort zone that will require immense amounts of craftastrophic potential before it's finished and book worthy. I've got to finish the text for my book and send out the materials for the front matter photo shoot, labeled and ready to roll. There are boxes that need packing and shipping and other boxes that need unpacking and organizing. We haven't made a new video in months and I'm slated to go out of town and film a promo for the cruise...

Thus is the story of what I do every day. In case you were wondering. The life of a freelancer is a tricky one. We have to take the work when it comes, because it's never consistent. Then we have to know when to say, "No." Which sounds fairly simple, but is not. It's hard to say no when your income pays a big portion of the bills. On the plus side, we schedule our own breaks and we can work in our PJs. So there's that!

I have officially hit the wall, so until I get caught up, I'm afraid that I will have to say, "No!" to any future requests.

Mrs. Potter regrets...

xoxo
Madge

Wednesday, July 22, 2009

Somewhere in Time

Somewhere in Time Mixed Media Necklace

This is a project for a taping I'm doing at CHA. I am sworn to secrecy as to how I created it until the episode airs. It's called Somewhere in Time after the film of the same name. This is one of my favorite Victorian images in my collection because she has a wonderful cat that ate the canary grin. Every time I look at this I think someone must have just said something terrifically naughty to her right before the picture was shot.

You so rarely see smiles in these old photos, I believe it's because the camera shutter was open for so long it was hard to hold a smile. Her wicked little grin makes this image especially compelling. I've featured her in a Steampunk mixed media piece that will be in Jean Campbell's new book and I can not wait to show you when the book comes out.

I wanted this to look like an image under buried glass...lost in the ethers of time, frozen in this wonderful moment, buried under the years that have since passed. I think I achieved that objective.

I love ephemera because it's a lens. Old photographs are especially compelling because there are stories there, wonderful stories that have yet to be told. That is endlessly fascinating to me.

I must away to pack up my book and finish my CHA show prep. Until next time....craft on with your bad selves.

xoxo
Madge

Friday, July 17, 2009

Mixed Media Book Review: Fabric Art Collage by Rebekah Meier


Book Review
Amazon
Fabric Art Collage: 40+ Mixed Media Techniques by Rebekah Meier


I am delighted to give my hearty and heartfelt recommendation to Fabric Art Collage by creative genius
Rebekah Meier. This is, without doubt, one of the most sumptuous and idea packed creative tomes to cross my desk in ages. Ms. Meier has filled this book to the gills with bright ideas and brilliant inspiration.

A mixed media book with a fabric focus, this will certainly appeal to quilters and fabric artists...but it's got a ton of appeal for mixed media artists working in jewelry making, collage and paper arts as well. I can not stop looking at this book and every time I do, I find something new and fascinating. There are products and techniques in these pages I have never, ever seen before and the sample gallery projects are all stunning.

What impresses me the most about this title is the vast amount of knowledge that Ms. Meier possesses and the ease with which she shares it with the reader. She writes clearly and honestly and her passion for her art comes through on every page. ANY creative person looking for some fresh ideas should buy this book. You will not be disappointed.

There are over 40 techniques and a huge array of finished projects to show you ways to integrate the techniques into your art. I am intrigued by lutradur and solvron, two items I had not heard of before reading this book. Even when she uses familiar materials, she uses them in entirely unexpected ways. In fact, Ms. Meier uses such a wide variety of interesting materials it is mind blowing. I simply can't stop gazing at the Black, White and Red Quilt and the Canvas Quilt. I love that Ms. Meier doesn't spoon feed you monkey see, monkey do projects, but shows you ways to tap your own creativity and let it flow.

Kudos to Ms. Meier and C&T Publishing for making a book that will have a place of honor at my bedside for many months to come as I thumb the pages in search of new inspiration before drifting off to sleep.

Margot Potter
The Impatient Crafter(tm)
Author The Impatient Beader Series
Bead and Wire Jewelry Exposed
Beyond the Bead

Wednesday, July 8, 2009

Mixed Media Jewelry Project Idea L'Africaan Choker

L'Africaan Choker copyright 2009 Margot Potter

I created this necklace recently for the folks from Beadalon. It’s called L’Africaan. Unfortunately it didn’t really work for their catalog pictures because it’s designed to curve snugly around your neck and not to be flat on a surface. So I got it back, which is actually great because I have to tell you that I’m simply mad for this design! I usually wouldn’t spend this much time on a personal piece...so it was kind of like a surprise gift from me...to me!

Yay me!

Now I wouldn’t want to keep all of this fun for myself...so I’m sharing this with you!

Yay you!

I did a few cool things here. I love designs with color, movement and texture, so this one offers all three. I used rubber tubing segments threaded with a 4mm CRYSTALLIZED™ bead (in padparascha, Indian sapphire, black diamond and pink opal) on a head pin alternated between loops of the fabulous new
Beadalon white wire strung over a memory wire base threaded through an 8mm white alabaster bead or an 8mm black vintage plastic bead with 4mm CRYSTALLIZED elements in jet or crystal AB on the wire ends. Size 1 crimp beads secure the wire ends and size 2 crimps attach the top of the wire segments to the base. I just flattened those with chain nose pliers. I used larger vintage faceted plastic beads around the base, but I’m thinking I’ll make another one of these with just the tubes and one with tubes and wire segments. Memory wire makes the perfect foundation for collar, bib and waterfall style designs. It’s tempered steel and it retains its shape no matter how many beads you load on it! You can add a clasp on the ends if your design is heavy like this one.

L'Africaan Detail

I love this exposed wire tendril look originated by the 2002 Saul Bell Design Award winner Nancilee Woodyard. (I believe it’s important to give credit where it is due.) It’s one of those techniques that’s endlessly inspirational. I made u-shapes by threading both wires into a core bead, so it’s a different kind of tendril with a more structured look. Since I have to expose the wire in my designs for Beadalon and I hate to repeat myself endlessly, I’m always trying to come up with new ways to crack the nut.

Madge in L'Africaan Choker

I imagined this as an African tribal collar, interpreted in totally modern materials. When you wear it you feel regal and fierce. You could go even further with this and alternate the lengths of wire and tubing for an even more dramatic effect. I hope this inspires you to explore something new in your work!

I like to think of these ideas I share with you as craft recipes, you make them your own by adding a dash of this and taking out that...tweaking the ingredients to suit your personal taste. Copying someone’s work is...well...boring and frankly, lame. You have it in you to do great things, so don’t be afraid to take risks and on occasion make glorious mistakes. If you do make a design inspired by my work, please email me and I'll post it here with links back to you! I love to see inspiration in action!

Until next time...craft on with your bad selves!

xoxo
Madge

Wednesday, June 24, 2009

Embossing on Slick Surfaces Mixed Media Technique

Stained Necklace and Earrings from Beyond the Bead Copyright 2009 Margot Potter


My new book Beyond the Bead is overflowing with fun and easy mixed media techniques for the jewelry maker. One of my favorites is using embossing powder on slick surfaces. I've embossed on acrylic, glass, frosted glass and even ceramic. You can seal the final result with a clear laminate so it doesn't chip.

1. Use a dryer sheet to clean your surface to remove any static electricity.
2. Get a rubber stamp with an interesting image that isn't too detailed or tiny. Stamp with an embossing medium.
3. Pour regular or ultra fine embossing powder on stamped image (on the surface you're embossing, not on the stamp!) Feel free to use colors if you like and even use a variety of colors for a varigated look.
4. Shake off excess powder on a scrap paper so you can put it back into the jar. Use an exacto knife to remove any stray particles. There will be a few that you won't be able to remove without damaging the image, I just let that go.
5. Use a heat tool to melt embossing powder.
6. Allow to dry.
7. You can (if you choose) use Alcohol Inks or Adirondack or other glass friendly pens to color the image in.
8. If you aren't sandwiching the image, use a clear laminate to seal it.

Tips:
Don't overheat plastic items or you'll end up with a melty mess! Some surfaces take longer to heat up, so be patient. Don't overmelt your powder, it's ready as soon as it turns glossy, you'll see it happen. Move the heat tool around to get the entire image. Don't use a hair dryer, it won't get hot enough, you need a heat tool designed for crafts!

(I used Ranger embossing medium, powder and inks and Diamond Glaze as a laminate.)

Here are a variety of projects I've done with this technique. I'd love to see what you do with this...so feel free to send a jpeg of your work to theimpatientcrafter@gmail.com and I'll post the images in my blog with a link back to you!

Earrings on Left Embossing Powder on Acrylic (earrings on right feature Earthenwood Studio beads)

Vintage Optical Glass Lens with Embossing Powder sealed with laminate from Beyond the Bead by Margot Potter copyright 2009

Glass frame from HHH Enterprises with Embossing Powder and Alcohol Inks From Beyond the Bead by Margot Potter for North Light Books Copyright 2009

Embossing Powder on Ceramic Copyright 2008 Margot Potter for Simply Beads

Friday, June 12, 2009

Free Mixed Media Jewelry Making Project Upcycled Spiral Spirograph Necklace!

Upcycled Spiral Spirograph Necklace Copyright 2009 Margot Potter
I love a good estate sale. Especially when they've got a ton of old paper and games and no one else wants them. There aren't many places these days where you can get that much fun for a quarter! Woo hoo!

I bought a Spirograph set and a bunch of old books at a local sale last year. I knew immediately that I wanted to make the pieces into jewelry. Yes, in my world, EVERYTHING can be repurposed and ANYTHING can be jewelry. Well, almost anything. A little adirondack ink, some old medical book pages, a little Mod Podge, a few well place drill holes...voila!

I submitted the concept to a magazine, they loved it. I sent them a pic of the finished project, they loved it. I sent them the project and had to go on eBay to buy a second game for the "before" photo for the article (for a lot more than a quarter as apparently Spirograph is a big ticket item over there. Who knew?) Unfortunately, the magazine decided not to run this quirky set.
Insert trombone sound...here.

Maybe one day it will come home to me so that I might enjoy wearing it! I plan to do some more with the plethora of Spirograph pieces I've amassed. Yay for thrifty goodness!

Their loss is your gain my fine friends!

Upcycled
Spiral Spirograph Necklace
Copyright 2009 Margot Potter

Materials

7 Vintage Spirograph wheels in varied sizes
Old book paper
3 6mm
olivine CRYSTALLIZED™-Swarovski Elements rounds
3 6mm
indicolite CRYSTALLIZED™-Swarovski Elements bicones
9 10mm
silver plated jump rings
Silver plated ring back
5-link section, 6-link section Quick Links ovals chain
Large
silver plated swivel lobster clasp
6 silver plated ball tipped head pins
Ranger Alcohol inks lettuce, bottle
Mod Podge Matte
Beacon
Dazzle Tac glue

Tools
2 pairs chain nose pliers
Round nose pliers
Electric Drill with 1/16” bit
Ink applicator with Felt Pad
Scissors
Marking pen

1. Apply inks to backs of Spirograph pieces using applicator tool and felt. Continue working until you reach desired effect. Allow to dry.

2. Trace Spirograph pieces on to old book paper. Cut paper with scissors or craft knife.

3. Use Mod Podge to glue paper to back of game pieces. Allow to dry.

4. Paint a coat of Mod Podge on backs of game pieces. Allow to dry.

5. Mark holes with pen and drill. There are existing holes you may be able to use, so survey the pieces before you drill!

6. Connect pieces as you desire using jump rings and two pairs of chain nose pliers.

7. Attach chain segments to the game pieces on each end of your center design using 10mm jump rings and chain nose pliers.

8. Create coil topped dangles with the crystals. Attach to a 10mm jump ring and to the second link from the center on the longer chain.

9. Attach lobster clasp to the longer chain using a 10mm jump ring.

10. Attach a second jump ring to the end of the shorter chain.

11. Use Dazzle Tac to attach a smaller game piece on a larger piece. Glue the back of the larger piece to the flat top of the ring blank. Allow to dry.

Supplies
Spirograph pieces and old book paper from estate sale, alcohol inks
Ranger, crystals CRYSTALLIZED™-Swarovski Elements, ring blanks Ornamentea, findings and chain Beadalon

Thursday, May 28, 2009

Flip Out Flip Flop Summer Free Craft Project from The Impatient Crafter Margot Potter


When I was a kid, rubber flip-flops worn anywhere but at the beach or on the boardwalk were considered to be the height of tacky. Somehow we’ve become so utterly casual that rubber flip-flops are everywhere these days. They’re flipping through the office corridors. They’re flopping along the shopping malls. They’re slapping and slopping their way into every location...even in the dead of winter.

Flip. Flop. Slap. Slop.

So...am I okay with that?!

Honestly? On one level I’m horrified and on the other I’m sitting here typing in a pair of rubber flip-flops so who the heck am I to judge?! Besides anyone who knows me knows that I LOVE shoes!

I’ve taken to the DIY Flip-Flop route after sizing up the price points of the upscale variety online and at the mall. When my daughter and I were shopping she mentioned wanting lace-up flip flops and I put on my thinking cap to make it happen. Here’s the 411 on The Goddess Flip-Flops...and stay tuned because this is the first installment in the Flip Out Flip Flop Summer™ Series!

Goddess Flip-Flops
Flip Out Flip Flop Summer™
Copyright 2009 Margot Potter

Tie on these saucy sandals when you want to release your inner Goddess. The laces minimize the flip-flop sound to make them a skootch more office friendly.

Materials
Black Rubber Flip Flops from Old Navy
Pair of long hi-top style shoe laces in light grey
24 black grommets
2 swirl pattern grungeboard by tim holtz™ sheets
2 8mm 5002 crystal AB (001 ab) CRYSTALLIZED™-Swarovski Elements beads
2 20 gauge silver plated head pins
Claudine Hellmuth Studio Line paint in charcoal black
Ranger Adirondack pigment ink pad in snow cap
Inkadinkado Flourish Stamp 96253-P
Claudine Hellmuth Studio Line paint brush
White pen (to mark hole placement)
Hello Kitty® Daisies Bigz™ Die
Aleene's Clear Gel Tacky Glue

Tools
Round nose pliers
Wire cutters
Chain nose pliers
Crop-A-Dile™
Ruler
Sizzix Big Shot Die Cutting Machine
Bead reamer or other drill with 1/16” bit

1. Die cut your grungeboard by tim holtz™ flowers using the Sizzix Big Shot and the Hello Kitty Die. Make two cut sheets.

2. Paint the four smaller flowers black and allow them to dry.


3. Use snow cap pigment ink to stamp flourishes on surface of flowers.


4. Allow to dry.

5. Glue flowers together.

6. Drill a small hole in the center of each flower.

7. Thread each flower with a beaded head pin.


8. Bend pin flush to the back of your flower and cut to approximately ¼”.


9. Use largest part of round nose pliers to create a large loop at the back of each flower.


10. Measure your straps and mark six evenly placed spots for holes on each side. Make the front holes close to the strap fronts and your final hole should rest on the lower side of your foot.

11. Use your Crop-a-Dile on the larger setting to punch out your holes. (You can opt for a hole punch here.)


12. Set your grommets with the Crop-a-Dile. (You can use a grommet setting tool here.)


13. Thread a lace into the underside of the outside of one of your flip flops and lace through the holes until you reach the center.

14. Thread under over, under and over the toe portion of the flip flop criss-crossing the lace into a small x.

15. Continue lacing down the outside of the flip flop until you reach the final hole.


16. Repeat for second flip flop.

17. Open and thread the looped flower into the top lace in the x design at the front of each flip flop. Secure closed.

18. Lace on your new creations and go have some fun already will ya?!