Showing posts with label aleene's liquid fusion. Show all posts

Wednesday, March 9, 2011

ILovetoCreate Teen Crafts: Edible Easter Centerpiece and Party Favor


ILovetoCreate Teen Crafts
Edible Easter Centerpiece and Party Favor
By Avalon Potter
“Teen Crafted, Mom Approved”

I love flowers, and especially Pink gerbera daises! I also happen to love jelly beans, parties, and crafts. I have always wanted to combine them all and with Easter on the way I thought of a perfect way to do it! This week’s project is an edible Easter center piece, with the delicious element of jelly beans and the adorable design of a pink daisy in a rick rack embellished pot!

Materials
Jelly beans
Cardboard
Styrofoam
Three colorful little buckets (we got these at Target in the dollar section)
Fake pink gerbera daises
Rick rack or colorful ribbon
Aleene’s Liquid Fusion Glue
Aleene's Foamtastic Glue

Tools
Scissors
Pen

Instructions

1. Gather all of your materials.

2. Wrap your ribbon around the base of the bucket to measure it and cut leaving a little bit of excess ribbon.


3. Apply a thin strip of Aleene’s Liquid Fusion glue to the backside of the ribbon and rewrap around the base of the bucket.

4. Repeat steps two and three for the top and bottom of all three buckets.

5. Measure the bucket width by drawing a circle on the cardboard with the bottom of the bucket. Then cut out the cardboard circle.


6. Take a chunk of Styrofoam and put it in the bottom of the bucket, then make a hole big enough for the flower stem in the cardboard. Add some Aleene’s Foam glue and slide the cardboard to the top of your foam.

7. Cut the flowers so that they fit in the pot making two the same size and the third taller.


8. Put the flower in the pot giving it a bend so you can see the flower face. Make sure the face is facing you.


9. Fill the pot to the top with jelly beans.

10. If you want to let your guests take these home, add a name on a card to the pot handle or the flower stem.

Tuesday, May 18, 2010

ILoveToCreate Teen Crafts: 'Let Them Eat Chocolate' Tampon Case


ILoveToCreate Teen Crafts
'Let Them Eat Chocolate' Tampon Case
Copyright 2010 Margot Potter
"Mom crafted, teen approved."

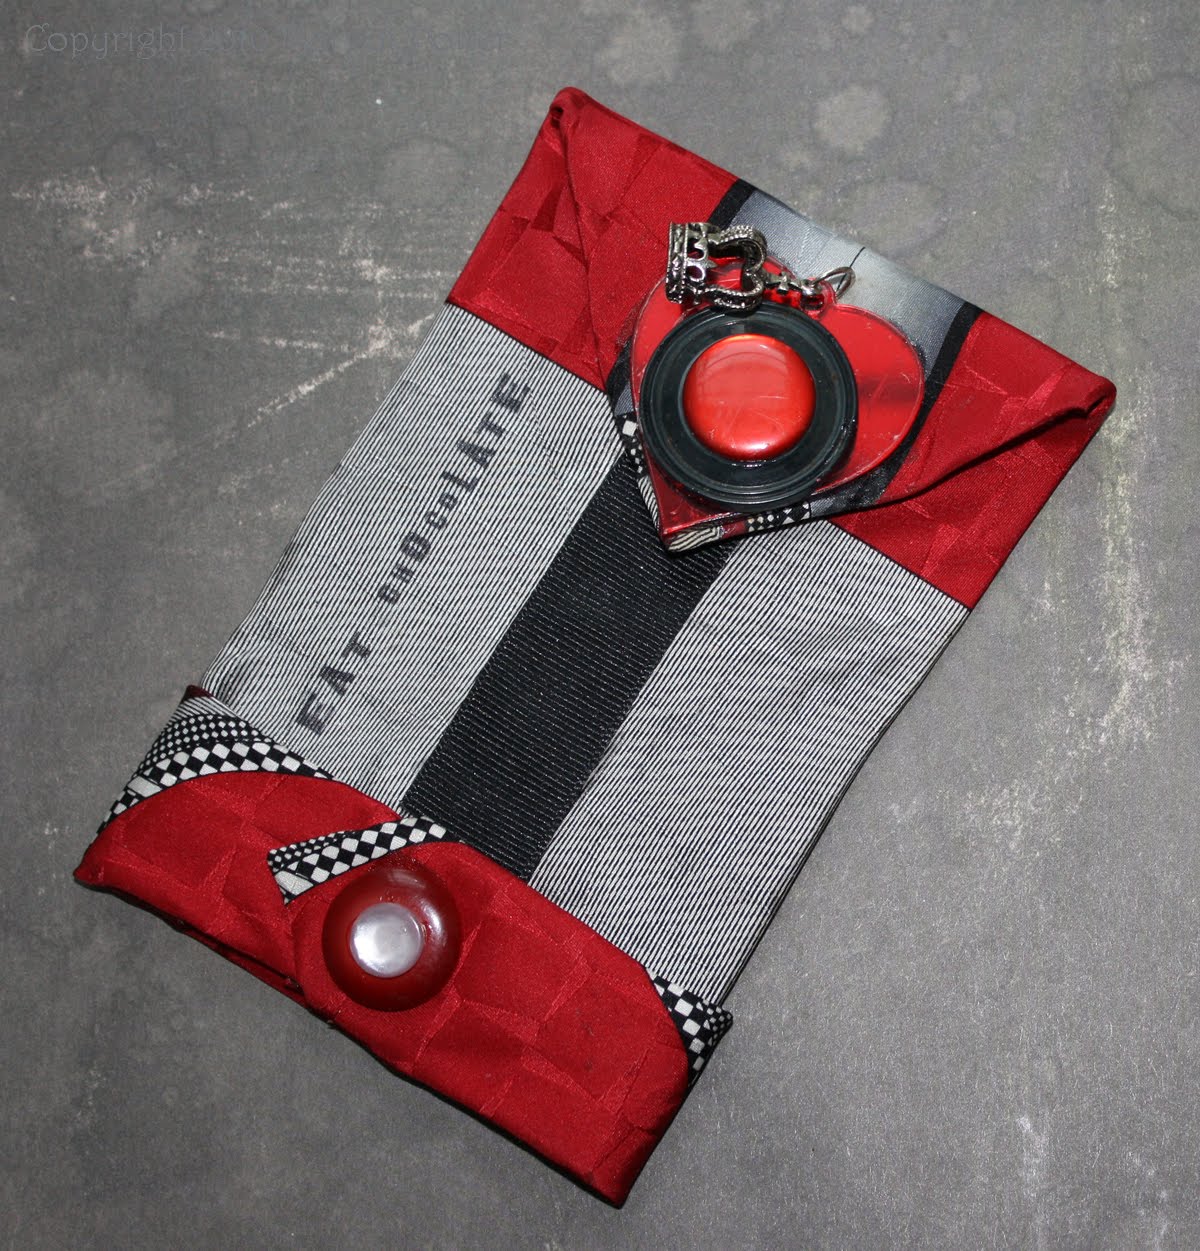
My husband and I used to own a gallery where we sold a variety of fair trade handicrafts, jewelry making supplies, vintage clothes and fun gift items. One of the items we carried was a wonderfully subversive Tampon Case created by an innovative young fella named Vinnie. Vinnie and I spoke a few times over the phone and I told him I'd love to see a more girly version. So I made a pink and felty one for my second book The Impatient Beader Gets Inspired (there's a pic below this post of that case.) My embroidered tampon case almost didn't make it into the book, but I fought for it and it stayed. Here's a new upcycled version made for the eco-conscious young lady who needs a stylish place to keep her feminine hygiene products and prevent them from getting destroyed at the bottom of her purse or book bag.

I'm of the mind that we need to be a little less weird about these things. Girls have periods. Got a problem with that?

Get over it.

So here's one for the girls! Being a girl is the best thing going. We should celebrate every aspect of what it is to be a girl and not be ashamed or afraid or uncomfortable. It's up to us moms to help our teens do that. This is a great project to do together and you can find fabulous old ties at the thrift stores for pennies. Aleene's Liquid Fusion glues turn this into a no sew project! Ya gotta love that. You can use the skinnier ties for iPod and cell phone pouches too. Vintage ties also make super cute skirts, bib necklaces, lamp shades, accents on purses...so get thee to the thrift store!


Materials

Vintage Tie (for this project a wider tie works best)
Coordinating Buttons
Large Heart Shaped Acrylic Charm
Metal 3-D Crown Charm
1" thick black grosgrain ribbon
Snap
Thin cardboard
10mm SP jump ring
Aleene's Fabric Fusion Glue
Aleene's Liquid Fusion Glue
Archival ink jet black
"Eat Chocolate" stamp Inkadinkado Amy Smyth 97479-MM

Tools
2 pairs chain nose pliers
Wire cutters
Chasing Hammer
Snap Setter
Steel Bench Block
Bench Block Pad
Disposable nail file or sand paper
Fabric Scissors
Crop-a-dile or 1/16" hole punch


1. Find a tie that's wide enough to create a sizeable pouch. You'll need to determine your needs based on the products you use. Measure tie taking into account a hem at the bottom and cut.


2. Use a seam ripper to open center of tie. Trace body of tie (not including top flap) on a thin cardboard or thick card stock.


3. Insert card stock into body of tie, cut off any excess card stock.


4. Fold bottom edge of tie and add a line of Fabric Fusion glue. Fold flaps over and add glue to secure. Add glue along seam of tie to secure closed.


5. Measure and cut bottom end of tie to wrap around bottom of pouch. Use Fabric Fusion glue to secure closed.


6. Attach snap to top of tie and corresponding area on pouch so it can be secured closed. I used a steel bench block, chasing hammer and bench block pad with the setting tool that came with the snaps.


7. Cut off and sand flush any shanks on the backs of your buttons using wire cutters. Glue layers of embellishments together with Liquid Fusion. Allow to dry. Glue to fabric surrounding snap using Fabric Fusion. Allow to dry. Add a second layered button accent to bottom tie flap on pouch with Fabric Fusion (see finished photo above.)


8. Use stamp and ink to stamp "eat chocolate" sideways on body of pouch. Allow to dry.

9. Glue a length of ribbon tucked into the tie accent at the bottom along the center seam to hide it.

Auntie Flo's Pretty Little Tampon Case from The Impatient Beader Gets Inspired
(Use Aleene's Fabric Fusion to glue layers after adding embroidery floss edges)

Tuesday, May 4, 2010

ILoveToCreate Teen Crafts: Funkadelic Flip Flops


ILoveToCreate Teen Crafts
Funkadelic Flip Flops

Margot Potter

"Mom crafted, kid approved."


Designing a teen craft project every week presents unique challenges and inevitably fills my mind with a series of questions as I sift through ideas. Is it too old fashioned? Is it too grown up? Is it too weird? Is it too funky? Have I lost my ever loving mind? This week’s project is no exception to the rule. It began with an innocent pair of acid green flip flops. Then I dug up some acid green fun fur I got from my friend Jenny Harada (monster maker extraordinaire.) From there I toyed with a garden/lawn theme...fuzzy pom poms were ceremoniously created and unceremoniously rejected. Daisies were contemplated with extreme seriousness. I mulled extensively over dimensional fabric roses. Then I threw all caution and good taste to the wind and went straight to funky town.

Sometimes you err to the side of Audrey Hepburnville and sometimes you go straight to Lady Gagaland. I think you can guess where I went this week. Are they hideous? Perhaps, yes. Okay probably, yes. Okay, yes. Do I love them anyway? You bet your sweet bippy I do!

I think teens will love them too, my daughter Avalon did. Let your teen modify this project to suit her style. She can glue fun fur, yarn, rick rack, zippers, ribbon or whatever tickles her fancy to the straps. Then layer up a fun focal piece using Liquid Fusion glue and a variety of Tulip Fabric Sprays and let that pedicure shine!

Life is short, why be boring when you can be outrageously fabulous? Why indeed.


Materials
Rubber Flip Flops
Acid Green Long Nap Fun Fur
2 wooden stars
2 open center scalloped foam hearts
2 yellow plastic vintage gum ball machine skulls from Sacred Kitsch Studio
Ranger Archival Ink Jet Black
Inkadinkado 99531 Animal Skins Clear Stamps
Fiskars Clear Stamp Base
Aleene’s Liquid Fusion Glue
Tulip Fabric Spray Paint in Neon Pink, Yellow and Orange
Crafty Chica Little Paint Pack in Yellow and White
Elasticity Clear Stretchy Cord

Tools
Foam or Regular Paint Brush
Fabric Scissors


1. Measure and cut fun fur strips. Jenny showed me a trick for cutting the fun fur, if you keep the point of the scissors in the base of the fur as you cut, you won’t end up with choppy fun fur or what she calls “a bad haircut.”


2. Mix a little white paint into the yellow and paint stars. Allow to dry. Add a spritz of orange fabric spray to the top. Allow to dry. Stamp using archival ink and leopard fur stamp.


3. Use a thick business or 3x5 card to mask off sections of the foam heart and spray with orange fabric spray. Allow to dry.


4. Remove spray nozzle from fabric spray bottle and use the end to flick pink and yellow paint on heart. Allow to dry.


5. Glue layers together, foam heart followed by star set to the right or left for each flip flop and skull on top of star. Allow to dry.


6. Use Elasticity to tie the heart to the flip flop strap. Use a double knot to secure and cut off ends. Glue the heart down to the fun fur on the flip flop strap using Liquid Fusion glue. Allow to dry.

Stay tuned for more fab flip flop ideas for ILoveToCreate this summer!

Tuesday, April 13, 2010

ILoveToCreate Teen Crafts: Jeepers Peepers Headband


IloveToCreate Teen Crafts
Jeepers Peepers Headband
Avalon and Margot Potter
“Kid crafted, mom approved!”

Avalon has the most fabulous imagination! We scored every last box of puff ball baby chicks on clearance at the craft store recently and she came home and glued one chick to a black leather headband that day. The kids at school went nuts for it! I loved it, but I suggested she add a few more...which she did and it was an even bigger hit. Then I asked her if we could use it as a teen craft project for ILoveToCreate. I added some lavender ribbon, daisy trim and glued her chicks back on to make a super cute spring headband. I am seriously considering a chicks tiara...


I think the best thing about kids and teens is that they don’t get limited by ‘rules.’ They’re willing to take creative risks and because of that they come up with really creative ideas.

It’s fun to design together and Aleene’s Liquid Fusion glue makes quick work of any craft project!


Materials
1” thick leather headband
2 small yellow puff ball chicks
2 large pink puff ball chicks
3/8” Textured Trios lavender polka dot satin ribbon
Wrights Creative Classics 7/8” Daisy Trim
Liquid Fusion Glue

Tools
Scissors

1. Glue one end of ribbon flush to back of one end of the headband. Spread a thin bead of glue along the inside center of the headband. Wrap ribbon one time around and begin wrapping slightly overlapping each time working your way around the headband. Make the final wrap, cut off excess ribbon and glue the end down. Allow to dry.

2. Measure the space for your chicks.  Glue the daisy trim on either side of the space down to each end of the headband with a thin bead of glue.  Allow to dry.

3. Glue the chicks to the space on the headband using a thick glob of Liquid Fusion glue. Allow to dry.

Tuesday, April 6, 2010

ILoveToCreate: Neon Impressionist Flower Pot


ILoveToCreate Teen Crafts: Neon Impressionist Flower Pot
Margot Potter
"Mom crafted, kid approved."

It's been a picture perfect spring in Amish country.  We even managed to get our garden started early this year!  That's a first!  Avalon is planting her own little flower garden and we've started the seeds indoors.  I was thinking it might be fun for her to plant a few flowers for the kitchen windowsill too.  I didn't want to put them in a plain terra cotta pot, not in our vibrant kitchen, so this project was born.  These pots are really fun to make with teens.  Just start with a base coat of Crafty Chica paint mixed into a pretty pastel color and add Tulip Fabric Sprays in neon colors to jazz things up.  Glue on some ribbon and faux flowers and you end up with a cheery little addition to the windowsill.


Materials
4.5"x5.5" Terra Cotta Pot with Matching Saucer
1.5" Thick Grosgrain Craft Ribbon Bright Green with White Stitching
2.5" Diameter Decorative Fabric Flowers (Orange and Pink)
Tulip Fabric Spray Paints in Neon Colors (Pink, Green, Yellow and Orange)
Crafty Chica Little Paint Pack (White and Yellow)
Aleene's Platinum Bond Super Fabric Textile Adhesive
Aleene's Liquid Fusion Glue

Tools
Foam Brush
Paint Brush
Scissors
Non-Stick Craft Sheet

1.  Mix the Crafty Chica yellow and white paint to get a pastel yellow.  Paint this on the pot with the foam brush.  Paint the edges and the saucer.  Allow to dry and paint a second coat.


2.  Use the Tulip Fabric Spray to create layers of color on pot and saucer.  You have to turn the saucer over to get the edges, so this is a two step process with a drying time for the top and the sides in between. Allow paints to dry.

3.  Smear Liquid Fusion across rim of pot and attach ribbon.  Allow to dry.

4.  Cut off stems and remove backs of flowers, keep a small amount of the plastic tab so you don't separate the layers, if you do just use the glue to reattach them.  Glue the flowers to the center of the ribbon on the pot rim, allow to dry with pot resting on the side so the flowers don't slide off.

Wednesday, March 31, 2010

ILoveToCreate: A Little Birdy Mother's Day Card


A Little Birdy Mother’s Day Card
Margot and Avalon Potter for ILoveToCreate
Copyright 2010
“Mom crafted, kid approved.”

Mother's Day is coming soon and here's a great way to give Mom something handcrafted and from the heart.  This card is a work of art she can frame and enjoy for many years to come. You can use any layered dies and coordinated papers you prefer so your card is custom made for your Mom!


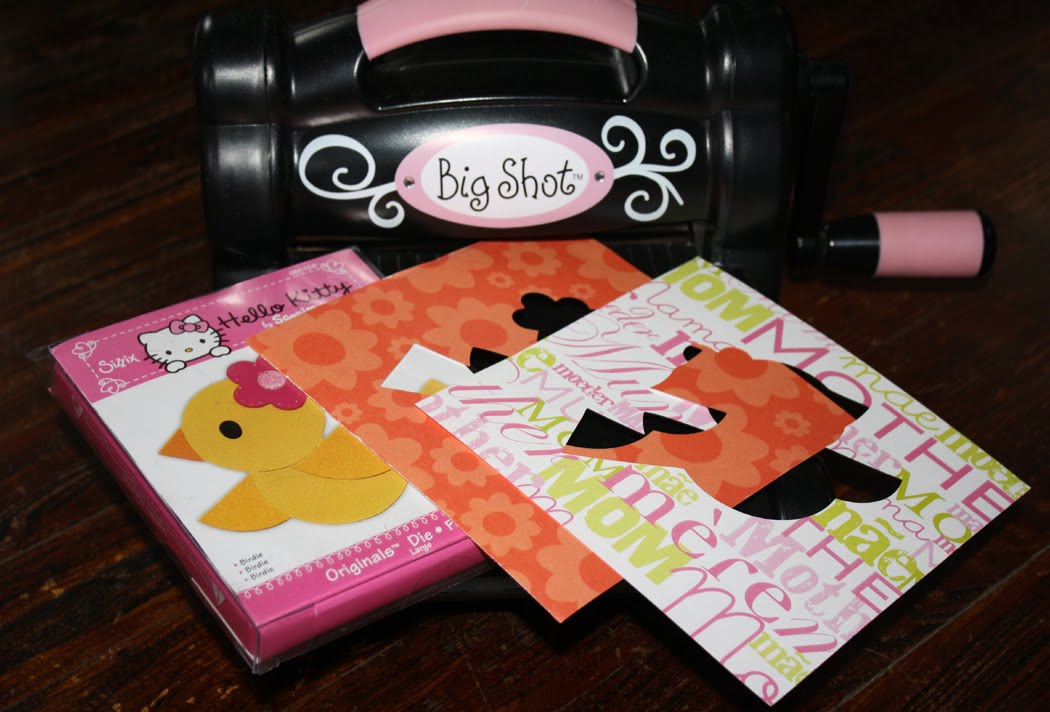
My daughter Avalon and I love all things Hello Kitty. I mean we LOVE all things Hello Kitty and particularly the array of characters in her pantheon. So when she picked out this adorable bird die and wanted to do a project with it, it was kismet. I'm really happy with how this all came together.  This card has everything I love on it and is from the person I love the most in the world. It really doesn’t get better than that, does it? You can use any layered dies you like, just gather up a variety of coordinating papers and cut the layers so they are multi-patterned. It is so easy to stick it all together with Aleene’s glue stick and Liquid Fusion glue. You can take a trip to pick up the materials and stop by your local thrift shop or Antique mall to score the buttons and have some good quality mother/daughter time. Let’s face it-every gal likes an excuse for a shopping trip!

Materials
Sizzix Hello Kitty Big Shot Die “Birdie”
Sizzix Large Folder Flowers, Spring and Paisley Embossing Set
Martha Stewart Lace Edge Punch
Coordinated Patterned Scrapbook Papers (you’ll need 5 different sheets)
Coordinated Heavy Cardstock in a solid color to match patterned papers
Various coordinating vintage or new buttons and buckles to stack in layers
Printed out text in Mia’s Scribblings 24 pt. from daFont.com “A Little Birdy Told Me It Was Your Special Day” and  “Happy Mother’s Day From Your Little Birdy”
Aleene’s Liquid Fusion Glue
Aleene’s Acid Free Tacky Glue Stick

Tools
Sizzix Big Shot Machine with accessories/platform
Scissors
Wire Cutters
Bone Folder
Precision Paper Cutter (I have a big office sized one here, but you can use a smaller one. )

1. Create your card background by cutting a large piece of cardstock to 11.5” tall and 7” wide on a paper cutter.

2. Fold paper along center, lining up edges and use bone folder to make a sharp crease.


3. Cut the Birdie die three times, using three different coordinating papers.

4. Use scissors to cut out elements in various colors for layering, following the marks left by the die cutter. I did the wings in one color, the flower and beak in another and the background in a third.

5. Use glue stick to adhere layers together.

6. Emboss a fourth coordinating patterned paper with the flowers folder.

7. Cut this on a paper cutter to 3.5” tall by 5.5” wide.

8. Cut a final coordinating paper to 4” tall by 5.5” wide.

9. Use the fancy edge punch to make a decorative edge along the top and bottom of the embossed sheet. Line the holes up with the image on the punch to make sure you get an unbroken line.

10. Print your text. Cut around text leaving a thin border.


11. Place inside text segment on a final coordinating piece of patterned paper and mark so you can cut it to frame your text.

12. Use a glue stick to layer the various elements. The front of the card starts with the centered 3.5x5.5 rectangle, followed by the centered embossed rectangle on an angle and the bird which is on an opposite angle. See photo for details.

13. Adhere text to the bottom left corner of the card with a glue stick.

14. Select buttons for top left and bottom right edges of your design, the flower and the eye on the bird. I took an old plastic buckle and cut out the center rung for the bottom left accent. I also placed the buttons so the inner buttons were flush to the edge of the central image. See photo for details.

15. Adhere the inside text to the border using a glue stick. Adhere that to the center of the inside of the card on an angle.

Tuesday, March 9, 2010

ILoveToCreate Teen Crafts: Graffiti Fabric Flower Headband


ILoveToCreate Teen Crafts
Graffiti Fabric Flower Headband
Margot Potter
"Mom crafted, kid approved."

It's National Craft Month and in Studio Madge it's starting to feel like National Craft FAIL month!  I started this project out with a graffiti fabric sling in mind for Avalon, who broke her wrist recently.  There's this old saying I seem to have trouble remembering about measuring twice...

...so the fabric I made was too small for a sling...but I love how it turned out so I decided to keep it for future projects.  Today I cut off four strips and made some fabric flowers using the ribbon flower technique I shared recently.  I love the tough and tender look I ended up with here and this will be even cooler as the flowers start to fray!  Fabric flowers are EVERYWHERE this season and they are really easy to make.  So again, I remind you not to be afraid to make 'mistakes.'  Sometimes that's where our best projects come from!

Try adding these flowers to a pair of flip flips or attach them to a strip of felt and adding ribbon ties for a funky bib style necklace or sew them on the neck of a t-shirt or on the front of a hoodie...have fun with these!  You can make a bunch of these fabric swatches and keep them around for crafty inspiration.  The Tulip Fashion Graffiti line makes it fast and fun!


Materials
Tulip Fashion Graffiti Paint Cannon 
Tulip Fashion Graffiti Cannon Fabric Paints in lime green and hot pink
Tulip Big Phat Fabric Markers in yellow, black and hot pink
Tulip Fabric Spray Paint in fuchsia, lime green, deep green, hot pink and orange
Tulip Fashion Graffiti Stencils Love, Peace, Peace Sign, Fancy
Large white cotton sheet (pre-washed)
Liquid Fusion Glue
Thread

Tools
Scissors
Sewing Needle

1.  Fold a large white cotton sheet in half and put on a flat surface.  If it's warm, a front porch or driveway would work well.

2.  Place stencils on sheet and spray with paint canon and fabric spray colors.  Spray colors around sheet in layers.

3.  Remove stencils and repeat as desired.

4.  Use markers to accent stenciled words and images.  Draw your own shapes with the markers.

5.  Keep adding layers of color until you reach your desired result.  Let paints dry.


6.  Cut the sheet into 8" strips, they should be smaller on one end and graduate so they'll be a triangular shape when cut.

7.  Use a needle and thread to sew fabric strips into flowers.  Here is a ribbon flower tutorial with pictures.


8.  Attach flowers to headband.  First tack them down with thread and then secure them with Liquid Fusion glue.  Allow glue to dry completely before wearing.