Showing posts with label halloween crafts. Show all posts

Wednesday, September 22, 2010

ILoveToCreate Teen Crafts: Spooktacular Party Invitation


Spooktacular Party Invitation by Avalon Potter for ILoveToCreate Teen Crafts

Avalon has another fab teen craft for you this week. She made a gorgeous Halloween pop up party invitation that is perfect for the season. Pop up cards are surprisingly easy and fun to make and this design could easily be modified for any number of holidays and special occasions. Avalon loves working with paper to make dimensional projects and this one really rocks!

Spooktacular Party Invitation

Avalon Potter for ILoveToCreate
“Teen crafted, mom approved”

With September coming to an end I thought it was time to do a Halloween craft. At my age more of us go to parties then trick or treat so I decided to create a Halloween party invitation. This is fun to make and then a few weeks later you will have even more fun at your party! Making cards is simple, enjoyable, and a great way to kick off October.


Materials
Decorative black and white scrapbook paper
Orange cardstock
Halloween themed ribbon
Martha Stewart rickety fence edge punch (or other decorative Halloween themed edge punch)
Googly eyes
Aleene’s Tacky Glue
Aleene’s Tacky Glue Stick

Tools
Computer
Printer
Paper cutter
Craft Knife
Paper Scissors
Bone Folder

Step one: Once you have all of your materials cut your decorative scrapbook paper to 11 ¼” x53/8” inches. Fold your cut cardstock in half, the card fold is in the center of the 11 ¼” length. Make sure there is some of the decorative cardstock left over you will need it later. Use a bone folder to crease the card.

Step Two: Punch the fence from the orange cardstock. Make sure you have punched a little over 5 3/8 inches so if by accident you trim a little more paper off of your fence it won’t be a problem.

Step three: Cut the fence to fit the bottom edge of your card, attach with Aleene’s Tacky Glue stick. Any excess fence can be trimmed with your scissors.

Step four: Now get your ribbon, Aleene’s Tacky Glue, and scissors. Cut your ribbon so it won’t overlap your rickety fence, around 5 inches long. Apply it to your card by putting Aleenes tacky glue on the back then sticking on the left hand side of the card.

Step five: Take your orange cardstock and scissors. You will cut a piece of cardstock about 4 ½ inches long and 4 ¾ inches wide and then the paper about ¼ of an inch long on both sides so that you can use those flaps to attach the paper to the card


Step six: Now take the flap from and bend the ends into flaps. Bend a 1” fold and a 2.5” fold. This becomes the base for your pop up element. Use the glue stick to attach one flap on the bottom of the card and one on top so that when the card is open it makes a rectangle. See photo. Make sure when the card closes it bends with the card.

Step seven: Now take your remaining orange card stock and cut out a pumpkin to about 3 ¼”x4 ¼”. You could switch the pumpkin to a skull, spider, or black cat. This is the part where you can feel free to be creative.

Step eight: Use your craft knife to cut out a jack-o-lantern mouth with a small tooth at the top. You could also add a nose if you want to.

Step nine: Adhere the googly eyes to the pumpkin using Tacky Glue. Allow to dry.

Step ten: Using a fancy font (I used King and Queen font from dafont) write You are cordially invited... in 16 pt.. Then write the date, the address, the time span of the party and the R.S.V.P date in 8 pt.. Print. Don’t feel obligated to use black as the font color try red or maybe orange.

Step eleven: Use your paper cutter to cut out the printed material. The larger front element is 4.5”x1.25”. The invitation information is 3”x2.5”. Use the glue stick and glue the invitation into the pumpkins mouth with the tooth overlapping at an angle. Glue the pumpkin onto the front of the pop out piece of paper you glued to the card in step six, the invitation should almost rest on the bottom of the card when fully opened.

Step twelve: Apply the greeting on the front of the card with your glue stick. Glue it on an angle to give it a creepy affect.

Step thirteen: Punch a second fence element using the decorative scrapbook paper. Glue this to the inside of the card at the bottom.

Tuesday, October 13, 2009

Terrorific Tuesday Week #2!

terrorific tuesday week 2

Another week, another heapin' helpin' of Halloween fabulosity. Check out what creative crafters from across the blogisphere have for your craftertainment for this week's installment of Terrorific Tuesday!

This little light
Light up the night with this cute pumpkin votive holder from Kat the Fearless Crafter.

Sugar Skull Bracelet & Bats in the Belfry Choker
Candace is having way too much fun with shrink plastc! Check out these fun and charming crafts on the Spirit Clay blog.

Dollar Tree Decorated Lights Tutorial
Come and decorate some Dollar Tree Skulls with Crafterella, don't forget your sharpie markers!

The Impatient Crafter for iLoveToCreate
Whip up a Halloween Invitation that's a real 'hoot' with Madge in this project for iLoveToCreate!

Spooky Halloween Coasters
Cheryl Ball of Still Crafty After 50 shares some fun, funky, and spirited coasters!

Halloween Treat Bowl
Create a fun and festive treat dish with Inspired at Home!

Strands of Beads
Melissa creates a whimsical seasonal necklace based on the theme "pushing up daisies".

Basic Black Box Meets Pumpkin Patch
Whip up Halloween favor boxes in minutes with brand new Sizzix ScoreBoard dies.

Mummy Mannequin
Create a mummy that will be a memorable accent at your Halloween party with Pattiewack!

Munchkin Mama's Crispy Peanut Butter Balls
Munchkin Mama has a great recipe for no bake peanut butter balls that the whole family will want to make!

Witch Parking!!
Make a "Witch Parking" sign on the Mucky Finger's blog!

Vintage-Inspired Halloween Tree Topper
Shannon shows off her new Halloween tree topper, inspired by vintage crepe paper crafts!

The Impatient Crafter
Make a whimsical and elegant Halloween necklace with Madge!

Jack-O-Lantern Waterfalls
Studio Mama shows you how to make some fun and festive earrings for the Halloween season.

Glow in the Dark Jewelry
Use glow in the dark polymer clay and rubber stamps to produce eerie Halloween jewerly.

Crafty Chica's Paint Drip Pumpkin!
A loca idea on the fly turned out muy fantastico!

Free Printable Halloween Cup Sleeves
You’ll be a hit with these labels for hot beverages at your Halloween party.

Scarecow Sweatshirt
Sharron Westerfield shares a cute scarecrow sweatshirt she made from a fun downloadable pattern from Janome!

Halloween Ribbon Brooches and FascinatorsAlexa Westerfield a.k.a. Swelldesigner whips some quick and cute Halloween accessories!

R.I.P. Skeleton in CoffinGuarantee a spooktacular Halloween Party with a skeleton in a coffin treat filled centerpiece!

Happy October KewpiesFind inspiration in this colorful and cute candy corn Kewpie photo from Boopsie Daisy!

If you would like to join in the fun next week, e-mail Alexa at swelldesigner@yahoo.com and put in your subject line "Terrorific Tuesday". She'll get you added to the group!

Tuesday, October 6, 2009

Terrorific Tuesday Week #1!

terrorific-tuesday-2009-wee
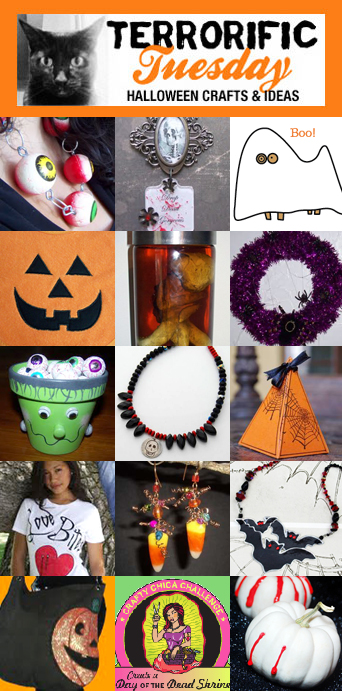
We're back! This is the first Terrorific Tuesday link parade and we're just getting started! Tune in every Tuesday for more spooktacular ideas from crafty bloggers around the web! Big thanks to Swell Designer Alexa Westerfield for coordinating this epic effort again this year!
Be afraid...be very afraid! Oh and then...be crafty!
xoxo
Madge

Studio Mama Blog Creep out your friends with this Leatherface-esque collection of eyeballs strung on hardware!

The Impatient Crafter Halloween is right around the corner and Madge kicks off the season with a stunningly spooky mixed media necklace and a bonus short story sure to send shivers up your spine!

Living Locurto - Halloween Doggie Dress-Up Free Printable Kids will love dressing up this cute doggie in different costumes!

Sharron Westerfield Create an adorable jack-o-lantern baby bib for your favorite little one!

Mantipi Specimen with Tutorial Join Crafterella in making you own spooky specimen jar using polymer clay.

Spooky Spider Wreath Welcome your guests with this cute and creepy wreath!

My Big Mouth Craft a mini Halloween candy dish that looks like Frankenstein

Strands of Beads Melissa creates a simple skully necklace to celebrate the season.

Halloween Pyramid Box This is perfect for use as a Halloween favor box or as an unusual decoration.

Allee Marderosian for iLoveToCreate Take your look to the Darkside with these Twilight Romance tees, perfect for Halloween festivities or everyday adventures!

Candace Jedrowicz - Spirit Clay These sparkly Candy Corn Riot earrings are made using real candy corn! No kidding!

Bat necklace A batty necklace you'll want to take a bite out of!

The Impatient Crafter Madge shows you how to make a super cute Halloween tote in this week's I Love to Create post!

Crafty Chica Dia de los Muertos Shrine Contest! The Chica, ILoveToCreate & Craft Zine have teamed up for a skullerific contest!

Alexa Westerfield a.k.a. Swelldesigner Inspired by her love for True Blood, Swelldesigner takes a stab at bloody white pumpkins!