Showing posts with label aleene's glue. Show all posts

Wednesday, December 22, 2010

ILoveToCreate Teen Crafts: Joyful Christmas Ornament


(Note from Mom: Avalon does it again! Love this sparkly glass ornament using Tulip Fashion glitter and Aleene's Tacky Glue Spray! Check out her latest teen craft project for ILoveToCreate. Am I proud? Does Santa like cookies?!

Uh, yes, yes he does.)

ILovetoCreate: Joyful Christmas Ornament

Avalon Potter
"Teen created, Mom approved."

I thought I would squeeze in one more holiday project because it is one of my favorite seasons. A few years ago my mom took a clear glass Christmas ornament and put crystals inside making a snow globe for your tree. It was one of my favorite projects she ever made, so I thought why not adapt her old project into something new! My project is a clear ornament that you spray wit Aleene's Tacky Spray Glue and coat the inside with Crafty Chica glitter! I enjoyed making these as gifts for my little cousins because it is fun, easy, and you can personalize each ball with different colors and tag to make it special for the person you give it to.

Materials
Clear ornament with opening top (preferably plastic in case of accident)
Aleene’s Fast Grab Tacky Spray
Tulip Fashion Glitter (green and red or colors of choice)
Colored paper to match glitter
White printer paper
Paper to make funnel
Aleene’s Original Tacky Glue Stick
Ribbon to match color of ball

Tools
Printer
Hole punch
Scissors

Instructions

1. Gather your materials.


2. Open up your ornament and lightly coat the inside with the Aleene’s Fast Grab Tacky Spray.

3. Make a funnel with a piece of paper and insert the bottom into the opening of the ball.

4. Pour a sufficient amount of the color(s) of glitter you choose into the ball. Feel free to mix colors or choose different colors then I used.


5. Close the ornaments top and shake until the ball is completely coated with sparkles. Shake the excess sparkles out of the ball.

6. Using a font you like print out in large letters the word or name you want as the tag. Use a similar color as the one you used in the ball. If you used two or more colors chose one for the font and another for the colored paper behind it.

7. Cut out the word and cut out your colored sheet of paper a slightly bigger into a rectangular card for the word to sit on.

8. Use your Aleene’s tacky glue stick to glue the word to the colored paper.

9. Punch a hole in the corner of the tag.

10. String some colored ribbon that matches the ball through the hole and tie a knot.

11. Tie onto the top of the ornament in a bow to complete the ornament.


Wednesday, September 22, 2010

ILoveToCreate Teen Crafts: Spooktacular Party Invitation


Spooktacular Party Invitation by Avalon Potter for ILoveToCreate Teen Crafts

Avalon has another fab teen craft for you this week. She made a gorgeous Halloween pop up party invitation that is perfect for the season. Pop up cards are surprisingly easy and fun to make and this design could easily be modified for any number of holidays and special occasions. Avalon loves working with paper to make dimensional projects and this one really rocks!

Spooktacular Party Invitation

Avalon Potter for ILoveToCreate
“Teen crafted, mom approved”

With September coming to an end I thought it was time to do a Halloween craft. At my age more of us go to parties then trick or treat so I decided to create a Halloween party invitation. This is fun to make and then a few weeks later you will have even more fun at your party! Making cards is simple, enjoyable, and a great way to kick off October.


Materials
Decorative black and white scrapbook paper
Orange cardstock
Halloween themed ribbon
Martha Stewart rickety fence edge punch (or other decorative Halloween themed edge punch)
Googly eyes
Aleene’s Tacky Glue
Aleene’s Tacky Glue Stick

Tools
Computer
Printer
Paper cutter
Craft Knife
Paper Scissors
Bone Folder

Step one: Once you have all of your materials cut your decorative scrapbook paper to 11 ¼” x53/8” inches. Fold your cut cardstock in half, the card fold is in the center of the 11 ¼” length. Make sure there is some of the decorative cardstock left over you will need it later. Use a bone folder to crease the card.

Step Two: Punch the fence from the orange cardstock. Make sure you have punched a little over 5 3/8 inches so if by accident you trim a little more paper off of your fence it won’t be a problem.

Step three: Cut the fence to fit the bottom edge of your card, attach with Aleene’s Tacky Glue stick. Any excess fence can be trimmed with your scissors.

Step four: Now get your ribbon, Aleene’s Tacky Glue, and scissors. Cut your ribbon so it won’t overlap your rickety fence, around 5 inches long. Apply it to your card by putting Aleenes tacky glue on the back then sticking on the left hand side of the card.

Step five: Take your orange cardstock and scissors. You will cut a piece of cardstock about 4 ½ inches long and 4 ¾ inches wide and then the paper about ¼ of an inch long on both sides so that you can use those flaps to attach the paper to the card


Step six: Now take the flap from and bend the ends into flaps. Bend a 1” fold and a 2.5” fold. This becomes the base for your pop up element. Use the glue stick to attach one flap on the bottom of the card and one on top so that when the card is open it makes a rectangle. See photo. Make sure when the card closes it bends with the card.

Step seven: Now take your remaining orange card stock and cut out a pumpkin to about 3 ¼”x4 ¼”. You could switch the pumpkin to a skull, spider, or black cat. This is the part where you can feel free to be creative.

Step eight: Use your craft knife to cut out a jack-o-lantern mouth with a small tooth at the top. You could also add a nose if you want to.

Step nine: Adhere the googly eyes to the pumpkin using Tacky Glue. Allow to dry.

Step ten: Using a fancy font (I used King and Queen font from dafont) write You are cordially invited... in 16 pt.. Then write the date, the address, the time span of the party and the R.S.V.P date in 8 pt.. Print. Don’t feel obligated to use black as the font color try red or maybe orange.

Step eleven: Use your paper cutter to cut out the printed material. The larger front element is 4.5”x1.25”. The invitation information is 3”x2.5”. Use the glue stick and glue the invitation into the pumpkins mouth with the tooth overlapping at an angle. Glue the pumpkin onto the front of the pop out piece of paper you glued to the card in step six, the invitation should almost rest on the bottom of the card when fully opened.

Step twelve: Apply the greeting on the front of the card with your glue stick. Glue it on an angle to give it a creepy affect.

Step thirteen: Punch a second fence element using the decorative scrapbook paper. Glue this to the inside of the card at the bottom.

Wednesday, June 30, 2010

ILoveToCreate Patriotic Flip-Flops!


ILoveToCreate
Patriotic Flip-Flops
Copyright Margot Potter
"Mom crafted, kid approved."

Who doesn't like to feel patriotic without feeling like a dork? Teens, that's who! I'm a fan of seasonal accessories as long as you don't start too look like someone on The People of WalMart blog. It's a fine line, people. These festive flip-flops are the perfect combination of '4th of July festive' and 'fashionista friendly.' They can be modified to suit the rest of the summer months with a little color change, so don't feel like they're only good for one day. Though for me, being patriotic isn't a one day event. Your teens will have a blast making these. Avalon pounced on them before the glue was even dry. I guess I'll have to make my own pair before the holiday!


Materials
Rubber Flip-Flops (I got my classic pair at Target)
3/10" wide navy blue ribbon with white stitching
1/4" wide dark red rick rack trim
2" wooden craft stars
2 silver-plated head pins or 20 gauge silver-plated craft wire
Aleene's Liquid Fusion Glue
Aleene's Jewelry and Metal Glue
Tulip Fashion Graffiti Big Phat fabric marker blue
Crafty Chica Little Chica Paint Pack paint white
8492-L Dawn Hauser Star rubber stamp from Inkadinkado
Elasticity clear stretch elastic cord

Tools
Brayer
Round nose pliers
Flush cutters
Non stick craft sheet
Electric drill with 1/16" bit


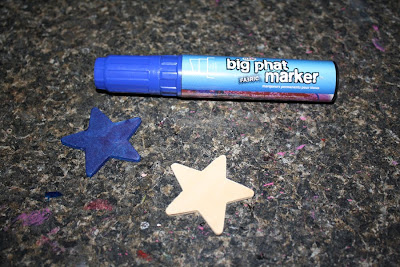
1. Use fabric marker to color star top and sides blue. Allow to dry.


2. Use brayer or foam applicator to spread paint on a non-stick sheet or directly on surface of stamp. Test print. Stamp on the stars. Allow to dry.


3. Glue blue ribbon trim to center of flip flop straps, starting at the bottom of the strap, tucking the ribbon into the space at the bottom and working your way to the center. It doesn't have to be pretty, the stars will cover it.


4. Glue rick-rack trim to center of blue ribbon again starting at the bottom of each strap, tucking the ribbon in and working to the front. Allow to dry.

5. Drill a hole in the center of each star.

6. Wrap rick rack trim around three times to create a 1 3/4" ribbon shape. There should be two loops on each ribbon.


7. Make a large loop at the top of a head pin, thread the center of your ribbon into the loop and secure it with the chain nose pliers. Thread this into the center of the star.


8. Use round nose pliers to create a loop flush to the back of each star, cut off excess wire before looping. The wire should be approximately 1/4" long before you grasp it with your round nose pliers at the end and wrap it around the jaw creating a round loop. Make sure the loop is secured closed.

9. Thread a 2.5" segment of Elasticity into the loop at the back of the star and around the front end of one side of the strap on your flip-flop. Tie it into a double knot (follow link for image.) Dab the knot with some jeweler's glue. Repeat for the other side of the same strap to secure the star. Repeat for second flip flop. Allow glue to dry before wearing flip-flops.

Tuesday, May 11, 2010

ILoveToCreate Teen Crafts: Totally 80s Pollack Inspired Tote Bag


ILoveToCreate Teen Crafts
How To Make a:
Totally 80s Pollack Inspired DIY Tote Bag

Margot Potter The Impatient Crafter™
“Mom crafted, kid approved.”

Sometimes you make crafty gold and sometimes you make...this purse, but whatever you do, own it fully and more importantly, enjoy the journey. By the end of several hours of earnest crafting, I was convinced I was staring at a full on craft fail. Then the buzzer sounded and I was staring at this tote bag, thinking...really, Madge? Is this your teen craft project for this week?!

All in all, this just might be a bit of a hot mess, but Avalon came home from school and absolutely loved it. Who knew?! I have to remind myself sometimes that my focus here is 'teen crafts', which means the projects can be quirky! This has definitely got a modern art meets the 80s appeal. It’s fun to let all propriety go and squeeze paint with abandon on a canvas. I can see why Jackson Pollack enjoyed it so much. In this case, the canvas is a tote bag and the paint is Tulip dimensional fabric paint. It’s the perfect medium for this kind of design because it won’t run and stays dimensional after it dries. After layering on paints, I carved out some floral shapes with the tip of a paint tube and embellished them with metal chain and the foil side of some old faux gemstones. Aleene’s glues make it easy to stick just about anything to just about anything else! The floral trim is from Prym-Dritz, I gave it an edge using a Tulip Fashion Graffiti Big Phat marker.

I think other teens will dig this too. (Yeah, I said dig it.) Send them outside with some canvas totes, markers, stencils, trim, adhesives and a bin full of fabric paints and sprays and let them make some glorious messes of their own!


Materials

Fuchsia Canvas Purse
Raveled Rosettes Fabric Trim
Tulip Fashion Graffiti Big Phat Marker
Tulip
Dimensional Fabric Paint Metallic Silver, Matte Black, Slick Fuchsia
Ranger Alcohol Ink Mixative Silver
Aleene’s Liquid Fusion Glue
Aleene's Jewel-it Glue
Flat back silver faux gems or the foil side of old faux gems

Tools
Scissors
2 pairs chain nose pliers


1. Layer Dimensional Fabric Paints on canvas by squeezing the tubes about 8 inches from canvas and moving the paint stream into circles and lines and squiggles. Keep making layers until you’re pleased with the results.


2. Use the tip of one of your paints to carve floral swirls out randomly.

3. Squeeze and shake silver mixative over paint layers randomly. Squeeze into the center of your carved floral areas (a little goes a long way.) Allow the paints to dry.


4. Use the marker to darken the frayed edges of the flower trim.


5. When the paints have dried, use Aleene’s Jewel-it to add gems to center of carved flowers.

6. Place chain around flower to determine length needed. Remove segment from core chain using pliers. Add a line of glue around flower and glue down chain. Repeat for each flower.

7. Glue the flower trim across the top of the purse using Liquid Fusion Glue. Allow to embellishments to dry.

Tuesday, March 30, 2010

ILoveToCreate Teen Crafts: Pretty in Peeps Pendant


ILoveToCreate Teen Crafts: Pretty in Peeps Pendant
Mixed Media Jewelry Project
Margot Potter
“Mom crafted, kid approved.”
Copyright 2010 All Rights Reserved

I loves me some Marshmallow Peeps candies! How about you? Last year I bought a huge pile of them just to stack them up and stare at the fabulous colors. They’re so happy and fun filled. My daughter Avalon loves Peeps too. She loves them so much I can’t buy too many or she’ll turn into a Peep.

No, seriously.

I spent the better part of Easter season last year contemplating how to turn a Peeps candy into a bead. I thought about leaving one to sit for a few months and get nice and hard and then spraying it with a sealant...and heck that might work if you didn’t live in a 130 year old school house with a small mold problem. Methinks a moldy Peep bead would lack some appeal.

I finally settled on Sculpey Ultra Light polymer clay embellished with Crafty Chica paints and glitter and Tulip Glam It Up Studs. This could become a pin or a pendant or you could make a whole bunch of these on dowels and do a fun Peeps flower pot centerpiece like my edible bouquet from last year. I decided to make mine into a necklace and just added a bunch of springy Vintage and new Lucite and wood beads for a super cute necklace. If you really want to go to town, try making some Sculpey egg beads to coordinate...or add some polka dots and squiggles to large wooden beads...or do a collar of several Peeps that circle the neckline. I am not exaggerating in the least when I tell you that making these is so much fun, you’re going to look for reasons to make more!


Materials
Sculpey Ultra Light
Crafty Chica Little Chica Paints Red and White
3 Tulip Glam-It-Up Iron-On Studs Black
Crafty Chica Glitter Sunset Pink
Aleene’s Jewel-It Glue
Aleene’s Fast Grab Tacky Spray
Aleene’s Matte Finish Spray Sealant

Tools
Paint Brush
Polymer Clay Dedicated Toaster Oven
Sheet of Brown Kraft Paper

(To Make the Necklace:
Various Coordinated Beads in a Pattern That Makes a 16” or Longer Finished Length (I got the clear Lucite with green filament beads in NYC but here’s a source online and Beadin’ Path has a plethora of great vintage and new Lucite beads), 49 Strand .018 (or thicker) Beadalon Wire (always fill the holes of your beads with the wire), Beadalon EZ-Crimp Fancy Sterling Toggle Clasp, Mighty Crimp Tool and Wire Cutters)


1. Soften clay in your hands or by running it through a clay dedicated pasta machine until it is malleable. Use a real Peep as your guide to create a clay version. I bought some for research so I could get the size right...that’s my story and I’m sticking to it.


2. Use a sharp pointed object to create a hole in the middle of your rabbit’s head. This hole is threaded side to side so you can string the pendant on a necklace. Skip this step if you’re not making a bead.


3. Place rabbit on a sheet of Kraft paper on the baking tray and into a pre-heated 275 degree Toaster Oven. Watch the clay to be sure it doesn’t burn...it shouldn’t take very long to set. Mine took about 7 minutes...after I burned the first one. Oops.


4. Allow rabbit to cool. Mix red and white Crafty Chica paints to get a nice shade of pink. Paint rabbit. Allow to dry.


5. Place rabbit on a sheet of kraft or scrap paper. Spray with Aleene’s Tacky Spray. Pour a generous helping of pink glitter all over rabbit front and sides. Tap off excess and pour back into jar. Allow to dry.

6. Spray rabbit with Aleene’s Matte Finish Spray Sealant. Allow to dry.


7. Adhere the three Glam It Up studs to the face of your rabbit with the Jewel-It Glue. You’ll need to have a good dollop of glue so it fits into the recess on the stud. Use the handle of your paintbrush or a toothpick to remove any excess glue. Allow to dry.

Design Note: Do not eat this Peep.  It won't taste very good.  Trust me.

Tuesday, February 2, 2010

iLoveToCreate Teen Crafts Romantic Wristlet Ribbon Corsage


Romantic Wristlet Copyright 2010 Margot Potter for iLoveToCreate
(Click on images to view details)

iLoveToCreate Romantic Wristlet
Mixed Media Ribbon Corsage
Margot Potter
Teen Crafts
"Mom crafted, kid approved."

I have a deep and abiding love of all things vintage and romantic. When I saw this lovely wired damask ribbon I simply had to have it because I knew it would make the most charming ribbon flowers that would be delightful for Valentine's Day. A little sewing, a little Liquid Fusion, a little Aleene’s Fast Grab Tacky glue and you’ve got a lovely ribbon corsage or hair clip, pin, card embellishment... Make a whole bouquet of these on hard wire stems and give them to a sweetheart or glue a variety of these around the edges of a frame. The thinner the ribbon, the flatter your flowers will be. I doubled up two flowers to make a ribbon rose and added some vintage button accents and attached it to a ribbon wristlet for a simply stunning corsage. This would be perfect for a Valentine’s Day dance.

If your teen is a girlie girl, she’ll adore these flowers and they’re so fun and easy to make I guarantee you’ll be searching for ribbon to make more! These aren’t just for teens, they’d be perfect for bridesmaids too!  Heck I'd sport this wristlet myself.  I can't wait to surprise Avalon with this on her birthday this Thursday! 


Materials
Ribbon (I used 2.5” thick damask print ribbon with wired edges)
Vintage buttons
Thread
Magnetic purse snap
Liquid Fusion Glue
Aleene's Fast Grab Tacky Glue

Tools
Chain nose pliers
Sewing needle
Scissors

1. Cut an 11” length of red damask ribbon. Fold the edge on one end.

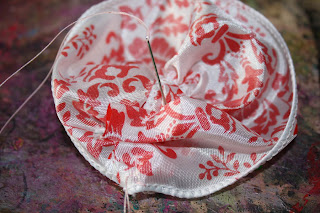
2. Use a simple basting stitch to sew the bottom edge of the ribbon.

3. Gently remove wire from top of ribbon.

4. When you get almost to the end of the ribbon, fold the end and sew the two ends together.

5. Gently pull the thread to create a flower.

6. Sew the edges together and finish. Cut off excess thread. Fold top edge over to create the first layer of your rose.

7. Repeat making a 9” flower.

8. Sew the two flowers together, nesting the smaller flower in the center of the larger flower. Fold edge over as before.

9. Glue a smaller white button into the center of a larger red button. While still wet, glue these to the center of the smaller flower. Use thread to tack the buttons down. Cut off excess thread. Allow glue to dry.

10. Fold a 5.5” section of black and white damask ribbon over itself to create one half of a bow shape. You should have a 2.75” bow end. Repeat on the other side, leaving the ribbon end attached to the spool.

11. Wrap the ribbon around itself and gently tug to create a bow. The bow should be 5.5” wide. Cut off excess ribbon.

12. Use the thread to secure your ribbon together and sew it to the bottom of your ribbon rose.

13. Measure and cut a length of ribbon to fit your wrist, leaving a 1” overlap on each end. Remove wire from both sides of ribbon.  Fold end over 1/2" thick, mark center placement of magnetic snap.

14. Cut slits for snap to thread into, thread snap into ribbon and bracket and fold over ends with chain nose pliers.

15. Tack a button over the exposed snap end on one side with thread, secure with Liquid Fusion glue and allow to dry.

16. Tack flower to center of wristlet with thread and secure with Aleene’s Fast Grab Tacky Glue. Allow to dry. You can remove your ribbon flower and attach to a hair clip when the wristlet gets dirty.

Tuesday, January 5, 2010

iLoveToCreate Lulu's Folly Mixed Media Purse

“A well dressed woman, even though her purse is painfully empty, can conquer the world.” Louise Brooks

iLoveToCreate Lulu’s Folly Mixed Media Purse
Copyright 2010 Margot Potter
Teen Crafts
“Mom crafted, kid approved.”

I scored a few paper purses at Old Navy on clearance last Christmas. I’ve slowly been making mixed media designs with them. This can be done on any paper or wood purse blank, they have tons of choices at your local big box craft chains. These kinds of designs for me have two purposes. Firstly they tell a story about a ‘woman of substance’ from history about whom I think it’s important young women know. These women paved the way for us and they’re fascinating creatures. This purse features silent film actress Louise Brooks. I have always adored her. She is credited with being the woman who made the bob haircut popular, which back in the 1920s was a huge thing. Bobbing your hair, rolling down your stockings and rouging your knees, applying bee stung lips...these were the rebellious acts of daring young women back in their day. These were women who dared to be different and who planted the seeds of independence we are reaping today. The second purpose of these designs is exploring the fun of playing with layers of colors, inks, images and dimensional elements to make wearable art. Purses are one of my guilty pleasures as a designer because they're the sort of fashion item that can be a bit more whimsical and fun.

Teens can choose any images they like and layer colors and elements to suit their individual style. Dab, layer, drizzle, splatter, stamp and have fun with this! I love inspiring people to make things their own and explore their unique creative eye. Don’t worry about coloring in the lines and following design rules, sometimes chaos can yield surprisingly pleasing results.

Materials
Purse Blank
Image of Louise Brooks or woman you admire sized to fit center of purse (remember that if you copy and use a copyright protected image you can ONLY use that for personal use and can not resell it.)
New or Vintage Scrabble Tiles to spell Lulu or other word
Transparency of butterfly from Art Chix Studios
Colored discs from Outside the Margins (one green, one blue and one pink)
4 crow dice from The Game Store
Optical vintage acrylic cabachons
Pink sparkly rick rack or ribbon trim to frame image
Archival ink jet black and crimson
Tulip Slick Paint Poppin’ Purple and Yellow
Tulip Pearl Paint Clover Green and Glacier Blue
Tulip Metallic Paint White and Silver
Crafty Chica Glitter Silver
Tulip Glitter in Diamond
Liquid Fusion Glue
Collage Pauge Matte
Aleene’s Platinum Bond 7800 Adhesive
20 Tulip Glam it Up Crystals 3mm
Flourish stamps (Lots of great ones from Inkadinkado)


Tools
Tulip Glam it Up Heat Setting Tool
Sea Sponge
Foam Brush

1. Adhere central image to purse with Collage Pauge matte. Allow to dry.

2. Begin by applying a layer of Tulip Metallics in white and silver using a sea sponge around image to edges of purse. Allow to dry.

3. Use archival inks in black and red to stamp flourishes across edges of purse and around image. Allow to dry.

4. Adhere butterfly to bottom right corner of image with Collage Pauge. (Don't paint any medium on top of transparency.) Allow to dry.

5. Use a foam brush to apply various layers of Tulip Pearl in Clover Green and Glacier Blue and Tulip Slick in Poppin’ Purple and Yellow and a thin coating of Tulip Glitter in Diamond. Allow to dry.

6. Run a thin bead of Liquid Fusion around edge of image and adhere rick rack trim. Adhere colored dics and add optical or glass cabachons. Allow to dry.

7. Glue scrabble tiles to left side of image and allow to dry.

8. Use Glam it Up wand to adhere crystals to tiles.

9.
Run a thin bead of Liquid Fusion around edges of purse and butterfly and sprinkle with silver glitter. Shake off excess and allow to dry. Add small sections of Tulip diamond glitter to left side of image using same process. Allow to dry.

10. Glue four dice feet to bottom of purse using 7800 Adhesive and allow to dry.