Showing posts with label beads. Show all posts
Thursday, December 23, 2010
Jewel School Newsletter!
I'll be on JTV's Jewel School this morning from 9am to Noon EST sharing some fun new techniques and projects. The Jewel School December Newsletter is here and we've got some great articles including one on getting organized for the New Year and a lovely fleece hat and glove set to keep you warm and stylish.
My next video on demand should be live by tomorrow, I'll add the link here. I'm sharing the 411 on the tools and materials you need to get started stringing jewelry!
Until next time...bead on with your bad selves!
Cheers,
Madge
Thursday, August 12, 2010
Free Jewelry Project #2 from Bead Chic by Margot Potter

It's Week #2 of the four week bonus Free Projects from my new book Bead Chic! Here's the one from the Make Jewellery feature I showed you last week. You'll need to get the book for the step by step photos.
Enjoy!
Leave a comment for a chance to win a free signed copy of the book!
If you left a comment last week, stop in on Saturday to see if you won, I'll announce this week's winner next Saturday!
Cheers,
Madge
Chaos in Pearls Necklace
Bead Chic
Chapter One: Scale
Copyright Margot Potter and North Light Books
ALL RIGHTS RESERVED
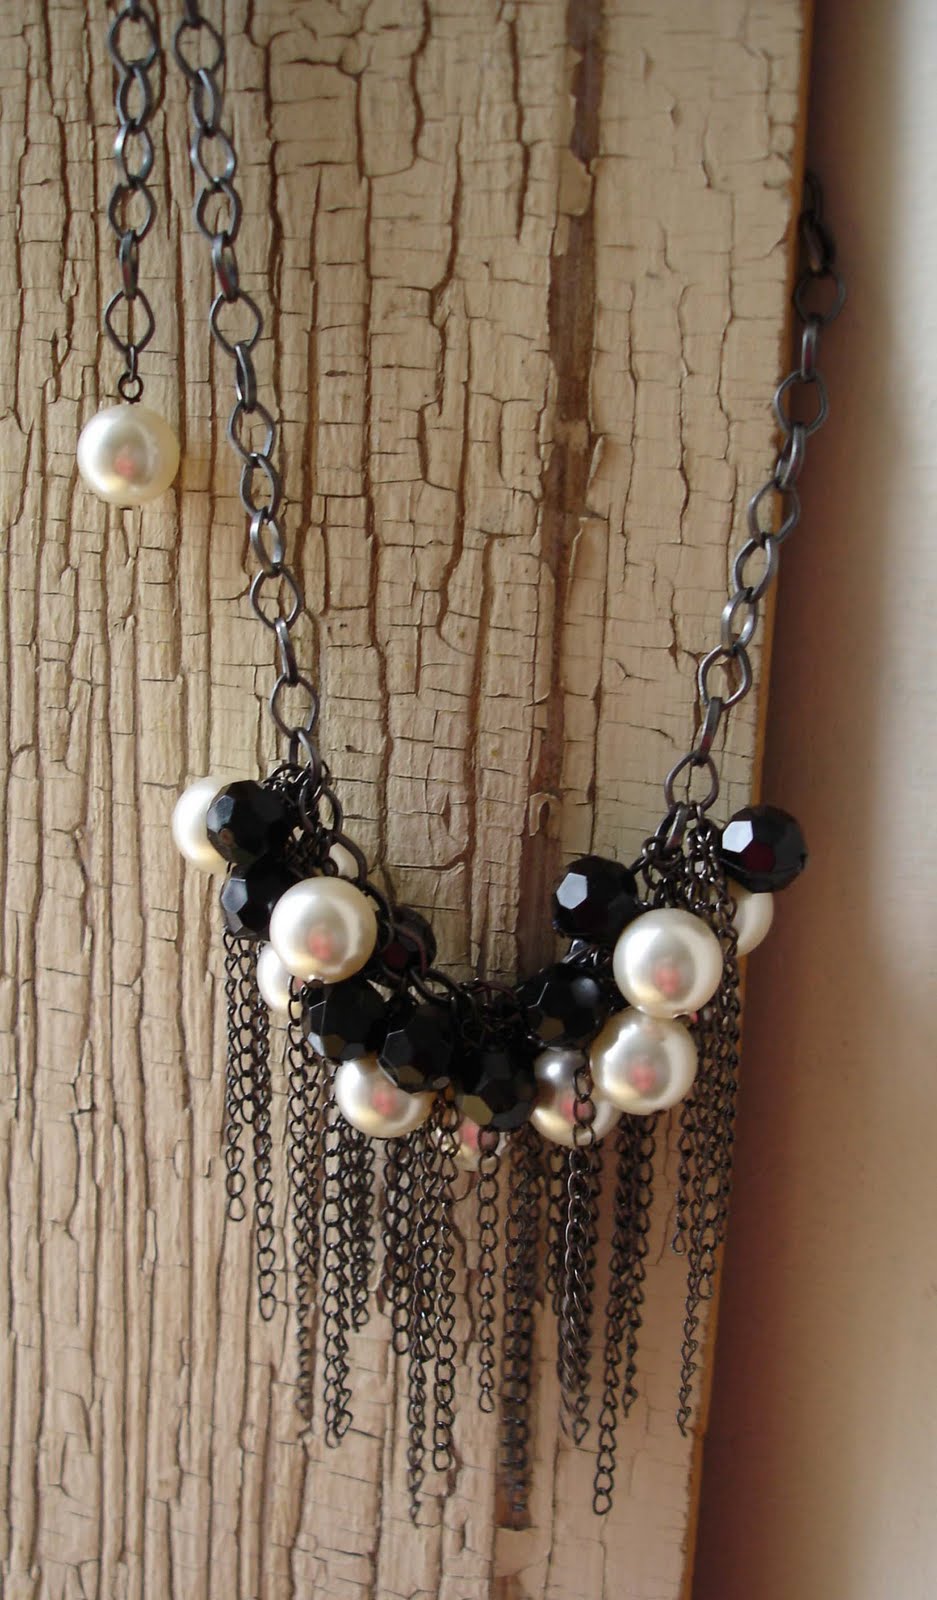
Crystal pearls, faceted plastic rounds and gun metal chains are clustered in a chaotic mass at the front of this daring, delightful and decidedly different necklace design. The less you map this one out, the better. You can opt to vary the chain lengths even more dramatically to give this an ‘haute couture’ design flavor.
Materials
13 8mm black plastic faceted rounds
14 12mm SWAROVSKI ELEMENTS cream pearls
39 1.5-3” lengths small gun metal curb chain
18.5” section gun metal oval rolo chain
27 gun metal head pins
1 large silver plated swivel lobster clasp
15 4mm gun metal jump rings
Tools
Round nose pliers
2 pairs chain nose pliers
Wire cutters
1. Cut 39 1.5-3” sections of small gun metal chain.
2. Create looped dangles for every pearl and faceted round.
3. Cut an 18.5” section of rolo chain. Attach a pearl to one end using a jump ring.
4. Attach the lobster clasp to the other end using a jump ring.
5. Starting on the 32nd link in your chain, attach a pearl, a faceted round and three varied lengths of small chain with a jump ring to the link.
6. Move down every link and continue attaching a pearl, a round and three varied lengths of chain on a jump ring. There are 13 pearl, round and chain combos.
Thursday, June 24, 2010
Let Them Eat Cake

Avalon at Carlo's Bakery in Hoboken
We took a quick day trip to NYC yesterday for a bead buy and a side trip to Hoboken. I've never been to Hoboken New Jersey, but Avalon is obsessed with The Cake Boss and when she heard NYC, she requested Hoboken on the side! Ya gotta love a gal who knows what she wants! Hoboken is just on the other side of the Hudson River, so it's the first exit out of the Holland Tunnel, which is on our way home. I've always wanted to go there, and who doesn't love cake?!
We intended to leave early, but as usual we left later than we intended, oh for more hands! It all worked out in terms of traffic with just a few snaggles in Manhattan. Thankfully, my husband did the driving. I have no patience, have I mentioned that?

We intended to leave early, but as usual we left later than we intended, oh for more hands! It all worked out in terms of traffic with just a few snaggles in Manhattan. Thankfully, my husband did the driving. I have no patience, have I mentioned that?

My Bead Score and Text from Avalon's Card for Buddy
Rhodochrosite...yummy.
I scored a pile of vibrantly colored and inexpensive beads and a single strand of rhodochrosite I simply could not resist. I rarely buy beads just for me, which is silly considering how many beads I own, but sometimes I find a strand that beckons...

Avalon spent all day on Tuesday making a die cut pop up 3-d cake card...twice. There was some serious drama around Studio Madge that day on top of the card making meltdown, so our delicious dinner that evening at The Blue Pear was well earned! Avalon wanted to give the card to the Cake Boss, but we knew Buddy was going to be away. When we drove into Hoboken there was a huge line out in front of the shop. They had cops out front and a door person! I can't believe they can keep up with the volume!
We decided to have lunch first to gear up for a long wait in the 90 degree weather, but by the time we finished eating and got to the bakery the line was thankfully gone. I didn't get a pic of the card, sorry, but once we got there and I saw Buddy's sister Mary at the end of the counter Avalon got a little freaked out. So I gave Mary the card. Frankie came down stairs while I was waiting to speak to Mary, which was pretty cool. Mary ended up down at our end of the bakery counter later. You would have think she was one of the Beatles, Avalon was so excited! She was busy with a customer, so we didn't get a picture of her. We got them to put Avalon's name on her lovely and expensive fondant covered cake and we headed home. I'm happy to report that the cake tastes as good as it looks! They don't call Buddy The Cake Boss for nothing!
A Most Awesome Avalon Cake from Carlo's Bakery

Hoboken is a charming city, if you go to NYC, I highly suggest a side trip. You'll be really glad you took it! More pics to peruse below...enjoy!
xoxo
Madge
Thursday, August 13, 2009
Black Forest Necklace for Art Beads
The fine folks from Art Beads asked me to select some CRYSTALLIZED-Swarovski Elements from their website recently for review. I have been working with the Create Your Style initiative since my first book and last year had the distinction of being named a Create Your Style with CRYSTALLIZED-Swarovski Elements Ambassador. So to say I love crystal...would be a vast understatement! I had a darker, moodier design in mind so I used olivine, tanzanite and black diamond as my color palette with gun metal and anodized steel accents.
The new aquiline bead is such an interesting shape, I envisioned a vine with some funky shaped fruit dangling off of it. The center rock pendant is another new shape I'm loving, notice if you can that it has both frosted and sparkling elements. I added a pop of purple featuring the newly launced xilion cut in 6mm in tanzanite, but since they seem to be sold out, you can opt for the 5301 in the same color.
Beads this gorgeous don't need a lot of gee gaws and doo dads, so I made a straightforward and simply striking design. I call this Black Forest.
Maybe I can find a home for it in a bead magazine...I'll keep you posted!
Cheers,
Madge
Thursday, July 30, 2009
Mixed Media Jewelry Project Fire and Water for Rings n Things


This is a design created from items I selected from the delightful folks at Rings n Things for their Blog Partner challenge. I've named it Fire and Water. I absolutely love this 26 gauge gun metal wire! I did a basic crochet chain stitch with just the wire. Provocraft has THE BEST crochet hook set with fabulous ergonomic handles I highly recommend, working with hard wire isn't easy!
When I finished the crocheted core chain off, I used a separate wire to thread crystals and pyrite beads into the chain. In true 'impatient crafter' fashion, I knew I could figure a way around crocheting beads into the core wire, which is futzy and frustrating. I've also done this technique with nylon coated cabled steel wire and I found it a little easier to get fluid stitches, but I love the organic feel of this piece.
I had to create wire wrapped bails for these magma CRYSTALLIZED™-Swarovski Elements coral pendants and I wanted to add more texture so I used some aged brass chain segments. The focal piece is a twist pendant again in this luscious magma color.
I've been playing with wire crochet for a while and I really love the way it looks. It's tough on the fingers, so be prepared, but it's really worth the effort.
I'll be back in the blog saddle on Monday. Until next time...craft on with your bad selves!
xoxo
Madge
Wednesday, June 24, 2009
Embossing on Slick Surfaces Mixed Media Technique
My new book Beyond the Bead is overflowing with fun and easy mixed media techniques for the jewelry maker. One of my favorites is using embossing powder on slick surfaces. I've embossed on acrylic, glass, frosted glass and even ceramic. You can seal the final result with a clear laminate so it doesn't chip.
1. Use a dryer sheet to clean your surface to remove any static electricity.
2. Get a rubber stamp with an interesting image that isn't too detailed or tiny. Stamp with an embossing medium.
3. Pour regular or ultra fine embossing powder on stamped image (on the surface you're embossing, not on the stamp!) Feel free to use colors if you like and even use a variety of colors for a varigated look.
4. Shake off excess powder on a scrap paper so you can put it back into the jar. Use an exacto knife to remove any stray particles. There will be a few that you won't be able to remove without damaging the image, I just let that go.
5. Use a heat tool to melt embossing powder.
6. Allow to dry.
7. You can (if you choose) use Alcohol Inks or Adirondack or other glass friendly pens to color the image in.
8. If you aren't sandwiching the image, use a clear laminate to seal it.
Tips:
Don't overheat plastic items or you'll end up with a melty mess! Some surfaces take longer to heat up, so be patient. Don't overmelt your powder, it's ready as soon as it turns glossy, you'll see it happen. Move the heat tool around to get the entire image. Don't use a hair dryer, it won't get hot enough, you need a heat tool designed for crafts!
(I used Ranger embossing medium, powder and inks and Diamond Glaze as a laminate.)
Here are a variety of projects I've done with this technique. I'd love to see what you do with this...so feel free to send a jpeg of your work to theimpatientcrafter@gmail.com and I'll post the images in my blog with a link back to you!


Embossing Powder on Ceramic Copyright 2008 Margot Potter for Simply Beads
Monday, May 18, 2009
Peekaboo...I see you!
Sometimes the muse is with you 100% and can take you from inspiration to fabulous finished designs in seconds flat! Yay Muse! Yay fabulosity! Yay something else but I’m not sure what so I guess I should stop typing now...
The folks at Rings & Things just keep coming up with wickedly cool products for the jewelry making afficionado. Here’s a design I whipped up super fast using their new hammered oval footage gun metal chain, black rattail #1 weight and some random stuff I had lying around the studio. I have a bead board on the sliding component of my work desk (the one the keyboard should go on...were I even marginally normal) and it’s my catch all for the beads that didn’t quite make it into a design. This bead board is constantly overflowing, but it’s a great one stop shop for accent beads! I rummaged for some beads that matched and added them to the chain and the top of the rusty vintage keyhole I decoupaged with a flapper image peeking through. I have a keyhole collection I’ve been slowly amassing over the past few years...I have plans for them. Yes. Yes I do. I added a gunmetal key and one frayed rattail bow accent and that was all she wrote. The plan is to let that rattail keep unraveling...so this piece gets cooler with age.
Rings & Things also sent me a copy of their extensive and information packed Gemstone Bead Index. I have always felt they have THE best website in the jewelry making biz in terms of information about what you’re actually buying and extensive gem history, lore and fun facts. Love them for that.
They sent me three cell phone lariats and a serpentine necklace in both gold and silver plate. Leave a comment and I select someone to receive these goodies along with a generous mix of beads randomly selected from my Bead Board of Wonders! I’ll announce a winner next week, please check back to see if you won and email me at theimpatientcrafter@gmail.com if you have problems leaving a comment and if you win so you can claim your prize. I can’t hunt you down all over the interwebs...it’s up to you to get that mailing address to me!
xoxo
Madge
Subscribe to:
Posts (Atom)